 by Tom Nelligan by Tom Nelligan
Of all the applications of industrial ultrasonic testing, flaw detection is the oldest and the most common. Since the 1940s, the laws of physics that govern the propagation of sound waves through solid materials have been used to detect hidden cracks, voids, porosity, and other internal discontinuities in metals, composites, plastics, and ceramics. High frequency sound waves reflect from flaws in predictable ways, producing distinctive echo patterns that can be displayed and
recorded by portable instruments. Ultrasonic testing is completely nondestructive and safe, and it is a well established test method in many basic manufacturing, process, and service industries, especially in applications involving welds and structural metals. This paper provides a brief introduction to the theory and practice of ultrasonic flaw detection. It is intended only as an overview of the topic. Additional detailed information may be found in the references listed at
the end.
1. Basic Theory: Sound waves are simply organized mechanical vibrations traveling through a medium, which may be a solid, a liquid, or a gas. These waves will travel through a given medium at a specific speed or velocity, in a predictable direction, and when they encounter a boundary with a different medium they will be reflected or transmitted according to simple rules. This is the principle of physics that underlies ultrasonic flaw detection.
Frequency: All sound waves oscillate at a specific frequency, or number of vibrations or cycles per second, which we experience as pitch in the familiar range of audible sound. Human hearing extends to a maximum frequency of about 20,000 cycles per second (20 KHz), while the majority of ultrasonic flaw detection applications utilize frequencies between 500,000 and 10,000,000 cycles per second (500 KHz to 10 MHz). At frequencies in the megahertz range, sound
energy does not travel efficiently through air or other gasses, but it travels freely through most liquids and common engineering materials.
Velocity: The speed of a sound wave varies depending on the medium through which it is traveling, affected by the medium's density and elastic properties. Different types of sound waves (see Modes of Propagation, below) will travel at different velocities.
Wavelength: Any type of wave will have an associated wavelength, which is the distance between any two corresponding points in the wave cycle as it travels through a medium. Wavelength is related to frequency and velocity by the simple equation
λ = c/f
where
λ = wavelength
c = sound velocity
f = frequency
Wavelength is a limiting factor that controls the amount of information that can be derived from the behavior of a wave. In ultrasonic flaw detection, the generally accepted lower limit of detection for a small flaw is one-half wavelength. Anything smaller than that will be invisible. In ultrasonic thickness gaging, the theoretical minimum measurable thickness one wavelength.
Modes of Propagation: Sound waves in solids can exist in various modes of propagation that are defined by the type of motion involved. Longitudinal waves and shear waves are the most common modes employed in ultrasonic flaw detection. Surface waves and plate waves are also used on occasion.
- A longitudinal or compressional wave is characterized by particle motion in the same direction as wave propagation, as from a piston source. Audible sound exists as longitudinal waves.
- A shear or transverse wave is characterized by particle motion perpendicular to the direction of wave propagation.
- A surface or Rayleigh wave has an elliptical particle motion and it travels across the surface of a material, penetrating to a depth of approximately one wavelength.
- A plate or Lamb wave is a complex mode of vibration in thin plates where material thickness is less than one wavelength and the wave fills the entire cross-section of the medium.
Sound waves may be converted from one form to another. Most commonly, shear waves are generated in a test material by introducing longitudinal waves at a selected angle. This is discussion further under Angle Beam Testing in Section 4.
Variables Limiting Transmission of Sound Waves: The distance that a wave of a given frequency and energy level will travel depends on the material through which it is traveling. As a general rule, materials that are hard and homogeneous will transmit sound waves more efficiently than those that are soft and heterogeneous or granular. Three factors govern the distance a sound wave will travel in a given medium: beam spreading, attenuation, and scattering. As the
beam travels, the leading edge becomes wider, the energy associated with the wave is spread over a larger area, and eventually the energy dissipates. Attenuation is energy loss associated with sound transmission through a medium, essentially the degree to which energy is absorbed as the wave front moves forward. Scattering is random reflection of sound energy from grain boundaries and similar microstructure. As frequency goes down, beam spreading increases but the effects of
attenuation and scattering are reduced. For a given application, transducer frequency should be selected to optimize these variables.
Reflection at a Boundary: When sound energy traveling through a material encounters a boundary with another material, a portion of the energy will be reflected back and a portion will be transmitted through. The amount of energy reflected, or reflection coefficient, is related to the relative acoustic impedance of the two materials. Acoustic impedance in turn is a material property defined as density multiplied by the speed of sound in a given material. For any
two materials, the reflection coefficient as a percentage of incident energy pressure may be calculated through the formula
|
Z2 - Z1 | |
R =
|
----------
| |
Z2 + Z1 |
where
R = reflection coefficient (percentage of energy reflected)
Z1 = acoustic impedance of first material
Z2 = acoustic impedance of second material
For the metal/air boundaries commonly seen in ultrasonic flaw detection applications, the reflection coefficient approaches 100%. Virtually all of the sound energy is reflected from a crack or other discontinuity in the path of the wave. This is the fundamental principle that makes ultrasonic flaw detection possible.
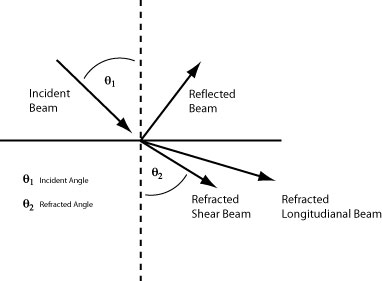
Angle of Reflection and Refraction: Sound energy at ultrasonic frequencies is highly directional and the sound beams used for flaw detection are well defined. In situations where sound reflects off a boundary, the angle of reflection equals the angle of incidence. A sound beam that hits a surface at perpendicular incidence will reflect straight back. A sound beam that hits a surface at an angle will reflect forward at the same angle.
Sound energy that is transmitted from one material to another bends in accordance with Snell's Law of refraction. Again, a beam that is traveling straight will continue in a straight direction, but a beam that strikes a boundary at an angle will be bent according to the formula:
|
Sin Ø1 | |
V1 | |
--------
|
=
|
-----
| |
Sin Ø2 | |
V2 |
where
Ø1 = incident angle in first material
Ø2= refracted angle in second material
V1 = sound velocity in first material
V2 = sound velocity in second material
This relationship is an important factor in angle beam testing, which is discussed in Section 4.

2. Ultrasonic Transducers
In the broadest sense, a transducer is a device that converts energy from one form to another. Ultrasonic transducers convert electrical energy into high frequency sound energy and vice versa.

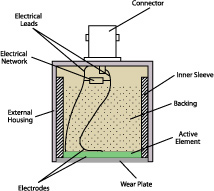
Cross section of typical contact transducer
Typical transducers for ultrasonic flaw detection utilize an active element made of a piezoelectric ceramic, composite, or polymer. When this element is excited by a high voltage electrical pulse, it vibrates across a specific spectrum of frequencies and generates a burst of sound waves. When it is vibrated by an incoming sound wave, it generates an electrical pulse. The front surface of the element is usually covered by a wear plate that protects it from damage, and the back
surface is bonded to backing material that mechanically dampens vibrations once the sound generation process is complete. Because sound energy at ultrasonic frequencies does not travel efficiently through gasses, a thin layer of coupling liquid or gel is normally used between the transducer and the test piece.
There are five types of ultrasonic transducers commonly used in flaw detection applications:
- Contact Transducers -- As the name implies, contact transducers are used in direct contact with the test piece. They introduce sound energy perpendicular to the surface, and are typically used for locating voids, porosity, and cracks or delaminations parallel to the outside surface of a part, as well as for measuring thickness.
- Angle Beam Transducers -- Angle beam transducers are used in conjunction with plastic or epoxy wedges (angle beams) to introduce shear waves or longitudinal waves into a test piece at a designated angle with respect to the surface. They are commonly used in weld inspection.
- Delay Line Transducers - Delay line transducers incorporate a short plastic waveguide or delay line between the active element and the test piece. They are used to improve near surface resolution and also in high temperature testing, where the delay line protects the active element from thermal damage.
- Immersion Transducers - Immersion transducers are designed to couple sound energy into the test piece through a water column or water bath. They are used in automated scanning applications and also in situations where a sharply focused beam is needed to improve flaw resolution.
- Dual Element Transducers - Dual element transducers utilize separate transmitter and receiver elements in a single assembly. They are often used in applications involving rough surfaces, coarse grained materials, detection of pitting or porosity, and they offer good high temperature tolerance as well.
Further details on the advantages of various transducer types, as well as the range of frequencies and diameters offered, may be found in the transducer section of our web site.
3. Ultrasonic Flaw Detectors
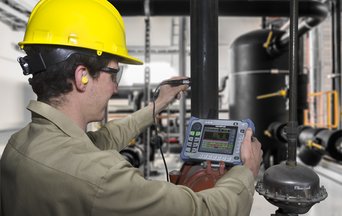
Modern ultrasonic flaw detectors such as the EPOCH series are small, portable, microprocessor-based instruments suitable for both shop and field use. They generate and display an ultrasonic waveform that is interpreted by a trained operator, often with the aid of analysis software, to locate and categorize flaws in test pieces. They will typically include an ultrasonic pulser/receiver, hardware and software for signal capture and analysis, a
waveform display, and a data logging module. While some analog-based flaw detectors are still manufactured, most contemporary instruments use digital signal processing for improved stability and precision.
The pulser/receiver section is the ultrasonic front end of the flaw detector. It provides an excitation pulse to drive the transducer, and amplification and filtering for the returning echoes. Pulse amplitude, shape, and damping can be controlled to optimize transducer performance, and receiver gain and bandwidth can be adjusted to optimize signal-to-noise ratios.
Modern flaw detectors typically capture a waveform digitally and then perform various measurement and analysis function on it. A clock or timer will be used to synchronize transducer pulses and provide distance calibration. Signal processing may be as simple as generation of a waveform display that shows signal amplitude versus time on a calibrated scale, or as complex as sophisticated digital processing algorithms that incorporate distance/amplitude correction and trigonometric
calculations for angled sound paths. Alarm gates are often employed to monitor signal levels at selected points in the wave train to flag echoes from flaws.
The display may be a CRT, a liquid crystal, or an electroluminescent display. The screen will typically be calibrated in units of depth or distance. Multicolor displays can be used to provide interpretive assistance.
Internal data loggers can be used to record full waveform and setup information associated with each test, if required for documentation purposes, or selected information like echo amplitude, depth or distance readings, or presence or absence of alarm conditions.
4. Procedure
Ultrasonic flaw detection is basically a comparative technique. Using appropriate reference standards along with a knowledge of sound wave propagation and generally accepted test procedures, a trained operator identifies specific echo patterns corresponding to the echo response from good parts and from representative flaws. The echo pattern from an test piece may then be compared to the patterns from these calibration standards to determine its condition.
- Straight Beam Testing -- Straight beam testing utilizing contact, delay line, dual element, or immersion transducers is generally employed to find cracks or delaminations parallel to the surface of the test piece, as well as voids and porosity. It utilizes the basic principle that sound energy traveling through a medium will continue to propagate until it either disperses or reflects off a boundary with another material, such as the air surrounding a far wall or found inside a
crack. In this type of test, the operator couples the transducer to the test piece and locates the echo returning from the far wall of the test piece, and then looks for any echoes that arrive ahead of that backwall echo, discounting grain scatter noise if present. An acoustically significant echo that precedes the backwall echo implies the presence of a laminar crack or void. Through further analysis, the depth, size, and shape of the structure producing the reflection can be
determined.

Sound energy will travel to the far side of a part, but reflect earlier if a laminar crack or similar discontinuity is presented.
In some specialized cases, testing is performed in a through transmission mode, where sound energy travels between two transducers placed on opposite sides of the test piece. If a large flaw is present in the sound path, the beam will be obstructed and the sound pulse will not reach the receiver.
- Angle Beam Testing - Cracks or other discontinuities perpendicular to the surface of a test piece, or tilted with respect to that surface, are usually invisible with straight beam test techniques because of their orientation with respect to the sound beam. Such defects can occur in welds, in structural metal parts, and many other critical components. To find them, angle beam techniques are used, employing either common angle beam (wedge) transducer assemblies or immersion
transducers aligned so as to direct sound energy into the test piece at a selected angle. The use of angle beam testing is especially common in weld inspection.
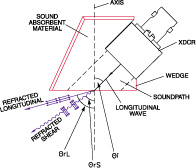
Typical angle beam assemblies make use of mode conversion and Snell's Law to generate a shear wave at a selected angle (most commonly 30, 45, 60, or 70 degrees) in the test piece. As the angle of an incident longitudinal wave with respect to a surface increases, an increasing portion of the sound energy is converted to a shear wave in the second material, and if the angle is high enough, all of the energy in the second material will be in the form of shear waves. There are
two advantages to designing common angle beams to take advantage of this mode conversion phenomenon. First, energy transfer is more efficient at the incident angles that generate shear waves in steel and similar materials. Second, minimum flaw size resolution is improved through the use of shear waves, since at a given frequency, the wavelength of a shear wave is approximately 60% the wavelength of a comparable longitudinal wave.

Typical angle beam assembly

The angled sound beam is highly sensitive to cracks perpendicular to the far surface of the test piece (first leg test) or, after bouncing off the far side, to cracks perpendicular to the coupling surface (second leg test). A variety of specific beam angles and probe positions are used to accommodate different part geometries and flaw types, and these are described in detail in appropriate inspection codes and procedures such as ASTM E-164 and the AWS Structural Welding Code.
Complete list of Olympus Flaw Detection Application notes.
Print
American Society for Nondestructive Testing, Nondestructive Testing Handbook, Volume 7, Ultrasonic Testing
ASM International, Metals Handbook, Volume 17, Nondestructive Evaluation and Quality Control
|
 by Tom Nelligan