Passive-Axis Focusing (PAF) Wedge Series
Simon Alain
Nicolas Badeau
Phased Array Focusing Wedges Help Decrease Inspection Reject Rates by Improving the Flaw Length Sizing Resolution
Many acoustic and inspection setup parameter validations are performed on flat blocks or plates even though the inspections are conducted on curved surfaces. Since the beam is affected by the radius of curvature at the various interfaces (for example, the wedge-to-part interface and back wall interface), the response to the flaw measured on a plate can be quite different from the response measured on a pipe. To address this challenge, Olympus developed a series of passive-axis focusing (PAF) wedges.
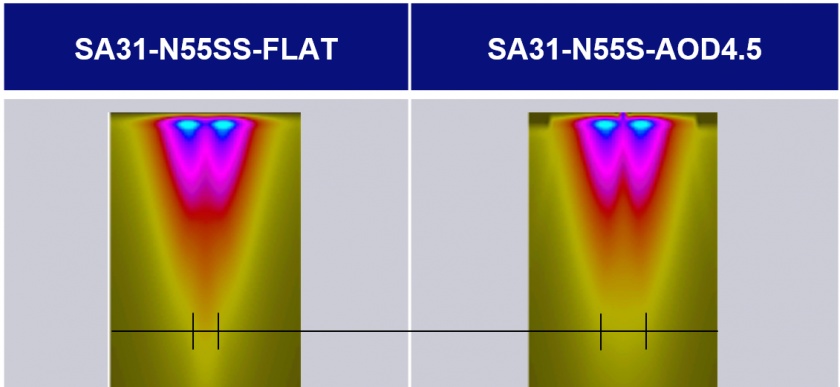
When an ultrasound beam propagates through a curved surface, the interface acts as a converging or diverging lens depending on the medium’s velocity ratio. In most typical NDT applications, the ultrasound passes from a low-velocity medium (such as a Rexolite wedge) to a high-velocity medium (such as carbon steel) through a convex interface such as an external pipe surface. This results in a diverging lens effect causing the beam width to broaden. The images below (see Figure 1) illustrate beam simulations (using CIVA software), showing the differences between the beam in the passive axis on a flat surface (left) and its equivalent when entering a 4.5 in. outside diameter (OD) surface (right). The first medium is Rexolite (pressure wave velocity of 2330 m/s), and the second medium is carbon steel (shear wave velocity of 3240 m/s).
As illustrated in Figure 2, the inside diameter (ID) surface (or back wall) of the pipe acts as yet another diverging lens, broadening the beam even more.

Figure 2 Beam divergence path for a standard wedge (left) and PAF focusing wedge (right)
Importance of the Beam Width for Scan Length Measurement
In most NDT applications, including girth weld inspection, the scan direction is along the phased array probe’s passive axis, and the flaw length measurement is performed using an encoded system. The most commonly used amplitude-based sizing method is the 6 dB drop technique. The advantage of this method is that the flaw length is not affected by the beam width. However, this is only true if the flaw is longer than the beam width. The measured length of a flaw shorter than the beam width will correspond to the beam width itself. For example, the shortest indication that a 5 mm wide beam can measure is 5 mm long. This means that all indications smaller than 5 mm will be measured as 5 mm.
Focusing Phased Array Probes
Standard phased array probes have been historically designed with plane elements because of their simplicity and versatility. Some probes that are specially designed for the inspection of smaller diameters feature curved elements (such as concave curvature in elevation [CCEV] probes) to counteract some of the divergence occurring at the part interfaces. However, this curvature value is fixed and, therefore, not optimized for a wide range of diameters.
Experimental Results
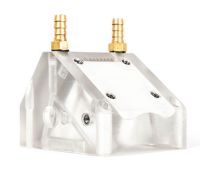
Two parts were manufactured with 1 mm diameter vertical through-holes separated by different distances. The parts and wedges used are shown in Figure 4. The first part is a plate (left), and the second one is a half-pipe (right) with an outside diameter of 4.5 in. A standard Rexolite wedge (SA31-N55S-IHC) with a planar bottom face was used to acquire data on the plate, and two other wedges with a curved bottom face matching the half pipe’s diameter were used to acquire data on the curved part. One of the curved wedges was a standard Rexolite model (SA31-N55S-IHC-AOD4.5), and the other was a PAF composite focusing wedge (SA31-N55S-PAF18-AOD4.5) with a lens radius of 18 mm.
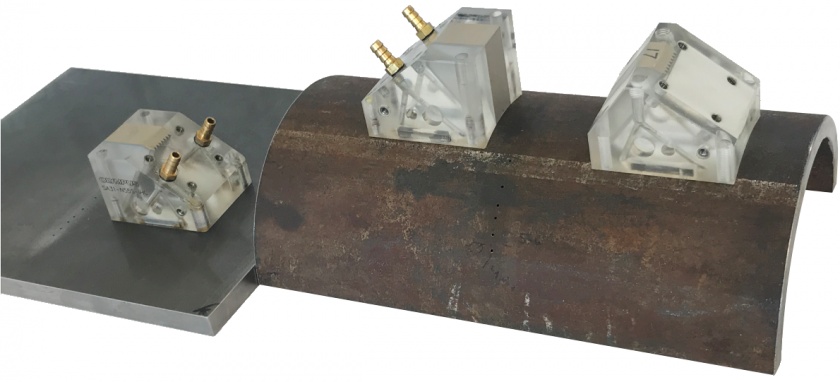
Figure 4 Plate sample with a standard flat wedge (left) and half-pipe sample with a standard and PAF wedge (right)
The objective of the experiment was to measure the beam width obtained with the three different wedges using the corner trap reflections of the through-holes on the ID (direct hit) and the OD (second leg) using the 6 dB drop technique.
The same ultrasound setup was used for all three wedges: a linear scan at 55-degree refracted angle (natural angle of the wedge) in shear wave with apertures of eight elements using a 5L32-A31 probe. The probe’s active aperture characteristics are as follows:
- 32 elements
- 0.6 mm pitch
- 19.2 mm active area
- 10 mm elevation
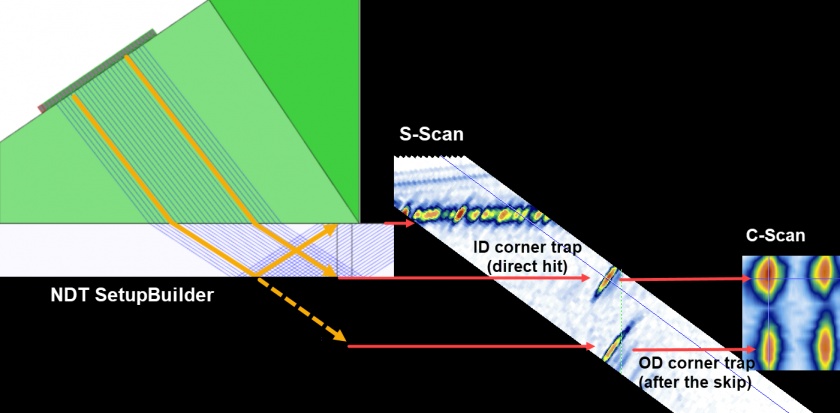
Figure 5 shows the relation between the C-scan view, the S-scan view, and the ray-tracing representation. On the left, an NDT SetupBuilder software view shows the lower beams hitting the OD corner trap after a reflection on the back wall and the higher beams hitting the ID corner trap. In the S-scan view (center), the ID corner trap appears higher than the OD corner trap as it arrives earlier in time. On the C-scan view (right), the OD and ID corner traps are represented on top of each other for every through-hole in the scan direction.
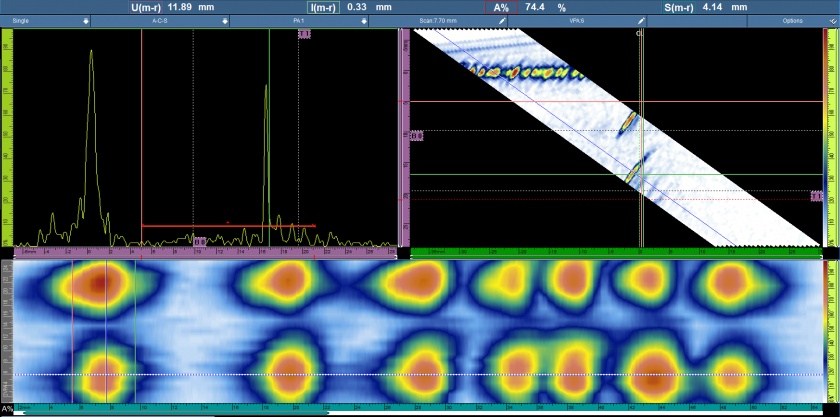
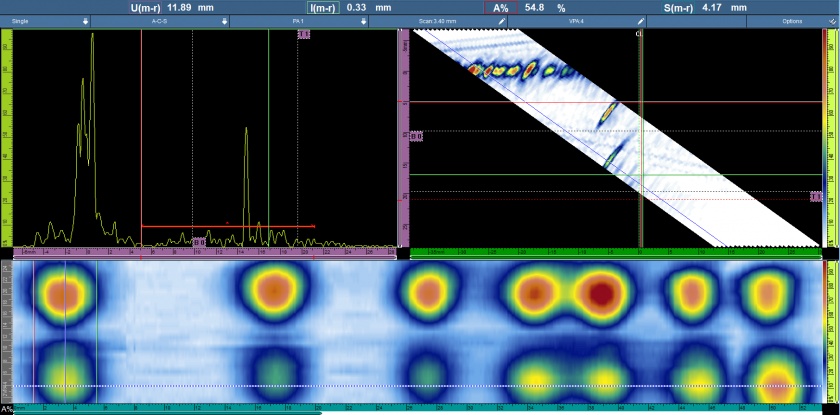
This first data set (see Figure 6) was acquired with the standard wedge on the flat plate. Although the reflectors are not perfectly uniform, the different corner traps of the seven through-holes are easily identifiable. The amplitude on the ID and OD indications are similar. Using the 6 dB drop technique, the beam width was measured to be 5.0 mm on the ID and 4.1 mm on the OD. The results are summarized in Table 1.
Figure 7 shows the second data set acquired with the standard wedge on the 4.5 in. external diameter half-pipe sample. The signal amplitude and flaw representation in the C-scan view are degraded compared with the previous results. It is difficult to determine the number of distinct indications present in the sample. The beam width was measured to be 5.7 mm on the ID and 7.5 mm on the OD. A beam width of 7.5 mm signifies that all indications would be measured to be at least 7.5 mm long. According to a common code such as ASME B31, which states that the maximum acceptable defect length is 6 mm or 6.4 mm depending on the code case, all indications detected with this setup would be rejected.
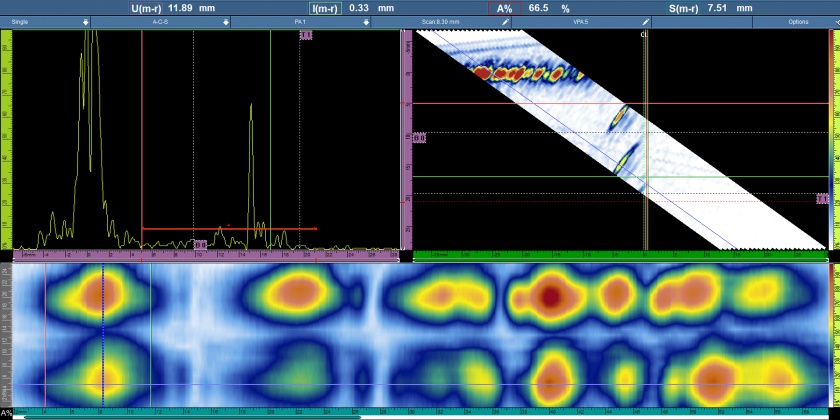
Figure 7: A-scan, S-scan, and C-scan views of data acquired with a standard wedge on the 4.5 in. OD pipe
The third and final scan (see Figure 8) was acquired with a PAF wedge series on the 4.5 in. external diameter half-pipe sample. The C-scan view is greatly improved compared to the standard wedge (see Figure 8). Furthermore, the overall image is even sharper than the one acquired on the flat plate. The measured beam width was 3.5 mm on the ID and 4.2 mm on the OD.
| ID
[mm] | OD
[mm] | |
|---|---|---|
| Standard wedge – Plate | 5.0 | 4.1 |
| Standard wedge – Pipe | 5.7 | 7.5 |
| PAF wedge series – Pipe | 3.5 | 4.2 |
Table 1 – Summary of beam width measurements
Other Impact of the Lens on the Ultrasonic Signal
The material used to produce the lens effect in the PAF wedge was chosen with an impedance as close as possible to that of the Rexolite to avoid acoustic ringing within the thin top layer but with a small difference in acoustic velocity to allow the beam to focus.
The test was conducted to define the gain difference between the new PAF wedge series and the standard wedge series when the indication amplitude is set to a specific level. Scans were done with both wedges— standard and PAF—using the 250% mode in the OmniScan™ MX2 flaw detector on two holes of the halfpipe sample. In post-processing, the numerical gain was adjusted to bring each indication to 80% of the full-screen height. Table 2 presents the final gain values in decibels for each indication and wedge combination. Notice that the gain levels required with the PAF wedge are lower than the gains for the standard wedge, because the energy is being focused.
| ID#1
[dB] | ID#2
[dB] | |
|---|---|---|
| Standard wedge – Pipe | 43.7 | 43.7 |
| PAF wedge series – Pipe | 41.6 | 42.3 |
| Difference | -2.1 | -1.4 |
| Average Difference | -1.75 | |
Table 2 – Gain difference between the standard wedge and the PAF wedge
Conclusion
The experiment clearly demonstrated the negative impact of the part curvature on the length sizing resolution capability. Thanks to the new PAF wedge series, the beam divergence caused by the part’s external curvature can be compensated using a simple solution that is compatible with standard phased array probes. Because of the resulting smaller beam width, the new PAF wedge series can measure smaller defects and provide sharper images to simplify data interpretation and decrease the rejection rate.
Reference
Patent Registration Data: Publication Number: US9952183.
Application Number: US14/851739
