Last updated on June 25, 2024.
One way that inspectors monitor for corrosion is by measuring the remaining wall thickness of pipes, tanks, ship hulls, or other metal structures. Often, these metal pipes and parts are coated with paint or a similar nonmetallic coating.
With conventional ultrasonic thickness gauges, the presence of paint or similar coatings will cause measurement errors, typically increasing the apparent metal thickness by more than twice the thickness of the paint due to the paint's much slower sound velocity.
The good news is that advanced ultrasonic gauges provide options to tackle this corrosion inspection challenge. Here we compare two methods used to measure remaining wall thickness on painted or coated metal surfaces. Learn how they work and discover their advantages and limitations.
Comparing Methods to Measure Remaining Wall Thickness on Painted or Coated Metal Surfaces
Two solutions to this problem are available for the 39DL PLUS™ and 45MG (optional) thickness gauges: echo-to-echo measurement and THRU-COAT measurement. Each technique has its strengths and weaknesses, so understanding both will help you pick the right solution for your application.

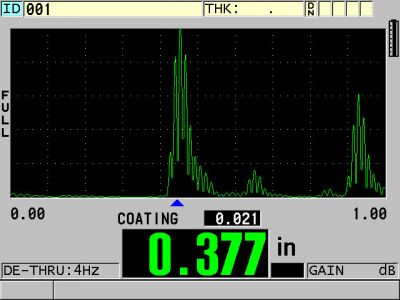
THRU-COAT measurement technology.

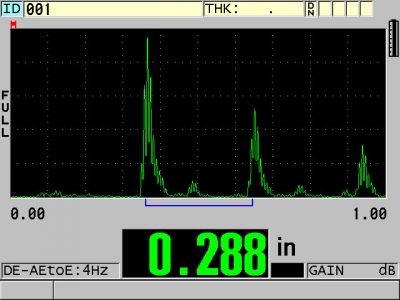
Echo-to-echo measurement.
1. Echo-to-Echo Measurement
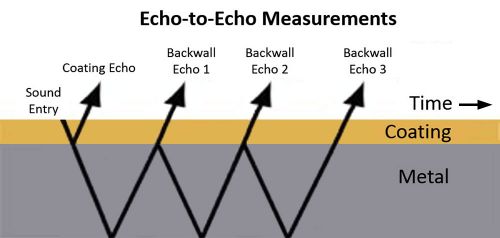
Echo-to-echo thickness measurement uses the well-established technique of timing the interval between two successive backwall echoes that represent successive round trips of the sound wave through the test material, as shown below.

How echo-to-echo measurement works.
In situations involving painted metal, these multiple backwall echoes occur only within the metal, not in the coating, so the interval between any pair of them (backwall echo 1 to 2, backwall echo 2 to 3, etc.) represents only the metal thickness, and the coating thickness is cancelled out.
The advantages of using the echo-to-echo technique include:
- Works with a variety of common transducers
- Often works through rough-surfaced coatings
- Can be performed at high temperatures up to approximately 500 °C (930 °F) with appropriate transducers
The limitations of the echo-to-echo technique include:
- Requires multiple backwall echoes, which may not exist in severely corroded metals
- Thickness range may be more limited than with THRU-COAT measurement
2. THRU-COAT Measurement
THRU-COAT measurement uses patented software to identify the time interval represented by one round trip in the coating. This time the interval is used to calculate and display the coating thickness. By subtracting this interval from the total measurement, the gauge can also calculate and display the thickness of the metal substrate.
The advantages of using THRU-COAT technology over the echo-to-echo technique include:
- Works over a wide range of metal thicknesses, typically from 1 mm (0.04 in.) to greater than 50 mm (2 in.) in steel
- Requires only one backwall echo
- May measure minimum remaining metal thickness more accurately when there is pitting in the metal
Some of the limitations of using THRU-COAT technology are:
- Coating must be nonmetallic and at least 0.125 mm (0.005 in.) thick
- Coating surface must be relatively smooth
- Requires you to use one of two special transducers
- Can only be used on surfaces with a max temperature of 50 °C (125 °F)
Check out this video or application note to learn more about echo-to-echo and THRU-COAT measurement.
Related Content
Corrosion Thickness Gauging with Dual Element Transducers
White Paper: An Introduction to Ultrasonic Thickness Gauging
.jpg?rev=6FBF)