When phased array ultrasound testing (PAUT) is used to inspect welds in pipes, such as in girth weld inspection applications, the common problem of beam spreading is amplified by the geometry of the part. Each interface of a pipe’s curved walls acts as diverging lenses, widening the acoustic beam in the passive axis (which is along the element elevation axis). The beam width along the passive axis of the phased array probe is instrumental to the precision of the flaw length sizing. When inspectors use amplitude-based flaw length sizing techniques, a large unfocused beam width in the passive axis can lead to higher rejection rates.
Physical Limitations of Linear Phased Array Probes in the Passive Axis
More often than you might think, inspectors reject flaws that are actually small enough to pass the required tolerances. How does this happen? The key reason is the inherent limitations of the ultrasonic testing (UT) equipment. Typically, when phased array probes are used, the ultrasonic beams are focused electronically in the active axis using beam steering, but they lack a mechanism to focus the beam in the passive axis. Our innovative passive-axis focusing (PAF) wedge series provides that mechanism.
Shortcomings of Amplitude-Based Flaw Length Sizing Methods
A common amplitude-based flaw length sizing method is the 6 dB drop technique. In the case of an inspection using a standard linear phased array probe, the inspector moves the probe laterally along the scan axis, which is parallel to the passive axis of the transducer array. Inspectors are trained to use the peaks and drops in the signal amplitude of the echoes from an indication to measure its length.
However, the 6 dB drop method only works on flaws that are the same size or longer than the width of the beam. Any flaw that is smaller than the beam is falsely assessed as being the same length as the beam’s width. For example, if the beam width is 7 mm, even a flaw that is 5 mm long will measure as 7 mm.
The Role of Beam Width in Increasing Rejection Rates
This 6 dB drop technique limitation becomes a major problem when codes, such as the American Society of Mechanical Engineers’ ASME B31, considers any defect longer than 6 mm (or 6.4 mm depending on the case) as rejectable. If the beam is 7 mm wide, then every defect that is smaller than 7 mm will be rejected, even some that are under the acceptable maximum length.

Typical ultrasonic beam divergence in a pipe (left) is minimized using a PAF wedge (right).
Magnifying the Problem: The Smaller the Diameter, the Greater the Divergence
In all ultrasonic piping inspection applications, the curvature of the surface acts as a diverging lens. The beam is further widened when it hits the curved back wall of the pipe (see the illustration on the left above). With smaller diameter pipes, this divergence is even more pronounced. Since the beam width has a direct impact on your flaw sizing capability, the wider the beam, the more likely acceptable defects will be rejected. Because smaller pipe inspections have more to gain from the advantages offered by PAF wedges, the standard series covers pipe diameters ranging from 4.5 in. OD to 8.625 in. OD.
Two Clear Advantages of Using Passive-Axis Focusing Wedges
Our passive-axis focusing wedges can help significantly reduce this beam divergence problem. The wedge’s patented design includes a curved interface between two materials with different sound velocities. The curvature inside the wedge focuses the beam in the passive axis. This beam focusing has two beneficial effects:
- Lower rejection rates since the smaller beam width enables correct sizing of smaller acceptable flaws.
- Interpreting the data is simpler because the images of flaws will be sharper along the scan axis.


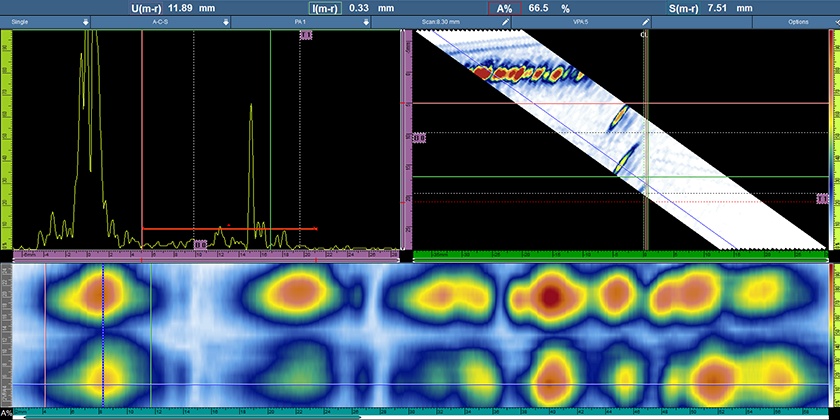
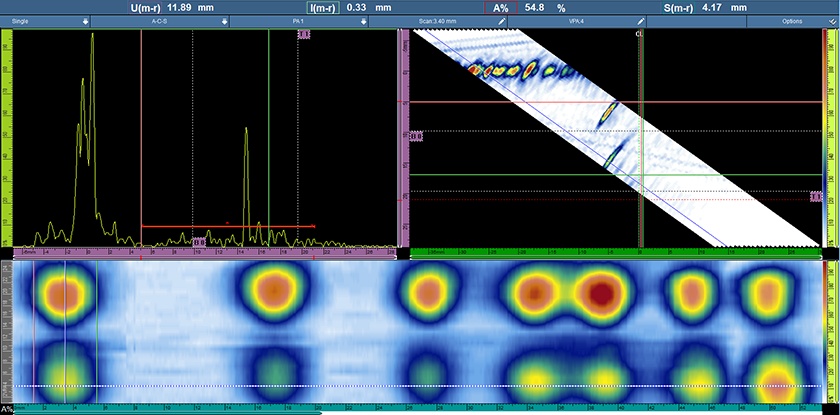
This experiemental setup illustrates the difference in sharpness of the C-scan imaging when using a standard wedge (top) and the PAF wedge (bottom) on a 4.5 in. OD half-pipe.
The results shown here are from experimental testing presented in detail in this white paper. In the setup, a phased array probe was used with a standard wedge and then a PAF wedge on a 4.5 in. OD half-pipe with 1 mm diameter drilled vertical through-holes. With the standard wedge, the beam width was 5.7 mm on the inner diameter (ID) and 7.5 mm when it returns to the outer diameter (OD). When the PAF wedge was used, the measured beam width was 3.5 mm on the ID and 4.2 mm on the outer diameter.
The PAF wedge provided a significant improvement in beam width, particularly on the outer diameter (4.2 mm as opposed to 7.5 mm with the standard wedge). If a code such as ASME B31 were applied (with its flaw length tolerances of 6 mm–6.4 mm), then some smaller flaws detected by the standard wedge would be unnecessarily rejected.
Related Content
White paper: Passive-Axis Focusing (PAF) Wedge Series
Easy Ultrasonic Phased Array Inspection of Corrosion—Resistant Alloys and Dissimilar Weld Materials
Phased Array Tutorial—Focusing with Phased Array Probes
Get In Touch
.jpg?rev=B6CF)
