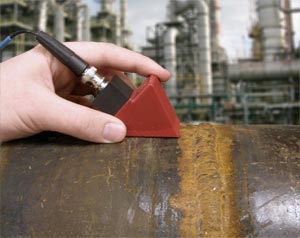
 Angle beam assemblies, consisting of a transducer and a wedge, are extremely important to the field of ultrasonic nondestructive testing, commonly used in a wide variety of weld inspection applications and also for detection of cracks oriented perpendicular to the surface in metal plates, pipes, billets, and forgings, as well as machined and structural components. This paper
is a brief review of the theory of angle beam testing, along with some notes and tips intended to assist users. Angle beam assemblies, consisting of a transducer and a wedge, are extremely important to the field of ultrasonic nondestructive testing, commonly used in a wide variety of weld inspection applications and also for detection of cracks oriented perpendicular to the surface in metal plates, pipes, billets, and forgings, as well as machined and structural components. This paper
is a brief review of the theory of angle beam testing, along with some notes and tips intended to assist users.
Why angle beam assemblies are used
Cracks or other discontinuities perpendicular to the surface of a test piece, or tilted with respect to that surface, are usually invisible with straight beam test techniques because of their orientation with respect to the sound beam. Perpendicular cracks do not reflect any significant amount of sound energy from a straight beam because the beam is looking at a thin edge that is much smaller than the wavelength, and tilted cracks may not reflect any energy back in the direction
of the transducer. This situation can occur in many types of welds, in structural metal parts, and in many other critical components. An angle beam assembly directs sound energy into the test piece at a selected angle. A perpendicular crack will reflect angled sound energy along a path that is commonly referred to as a corner trap, as seen in the illustration below.

The angled sound beam is highly sensitive to cracks perpendicular to the far surface of the test piece (first leg test) or, after bouncing off the far side, to cracks perpendicular to the coupling surface (second leg test). A variety of specific beam angles and probe positions are used to accommodate different part geometries and flaw types. In the case of angled discontinuities, a properly selected angle beam assembly can direct sound at a favorable angle for reflection back to
the transducer.

How they work -- Snell's Law
Sound energy at ultrasonic frequencies is highly directional and the sound beams used for flaw detection are well defined. In situations where sound reflects off a boundary, the angle of reflection equals the angle of incidence. A sound beam that hits a surface at perpendicular incidence will reflect straight back. A sound beam that hits a surface at an angle will reflect forward at the same angle.
Sound energy that is transmitted from one material to another bends in accordance with Snell's Law of refraction. Refraction is the bending of a sound beam (or any other wave) when it passes through a boundary between two materials of different velocities. A beam that is traveling straight will continue in a straight direction, but a beam that strikes a boundary at an angle will be bent according to the formula:
|
Sin θ 1 | |
V 1 | |
--------
|
=
|
-----
| |
Sin θ 2 | |
V 2 |
where
θ 1 = incident angle in first material
θ 2 = refracted angle in second material
V 1 = sound velocity in first material
V 2 = sound velocity in second material
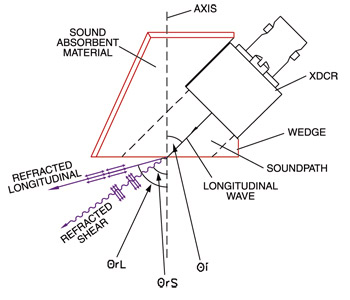
Typical angle beam assemblies make use of mode conversion and Snell's Law to generate a shear wave at a selected angle (most commonly 30, 45, 60, or 70 degrees) in the test piece. As the angle of an incident longitudinal wave with respect to a surface increases, an increasing portion of the sound energy is converted to a shear wave in the second material, and if the angle is high enough, all of the energy in the second material will be in the form of shear waves. There are
two advantages to designing common angle beams to take advantage of this mode conversion phenomenon. First, energy transfer is more efficient at the incident angles that generate shear waves in steel and similar materials. Second, minimum flaw size resolution is improved through the use of shear waves, since at a given frequency, the wavelength of a shear wave is approximately 60% the wavelength of a comparable longitudinal wave, and minimum flaw size resolution increases as the
wavelength of a sound beam gets smaller.
Traditional wedges are made of a single piece of machined plastic. Accupath wedges utilize a multiple material design in which a clear plastic insert that optimizes sound transmission is surrounded by structural material that has been selected for its sound dampening properties and durability, improving both signal-to-noise and wear resistance over typical one-piece designs.

Typical angle beam assembly
All standard wedges work in the shear mode. For some specialized cases, wedges can also be designed to generate longitudinal or surface waves. Longitudinal wave wedges are occasionally used on coarse grain materials in order to minimize scatter noise, although the longer longitudinal wavelength that reduces scatter noise also reduces sensitivity to small discontinuities. Surface wave wedges are used, as the name implies, for detection of surface-breaking cracks.
Selecting the right angle beam assembly
In many cases, inspectors will be directed to a specific type of angle beam assembly by an inspection code or procedure governing the test in question. The parameters that affect angle beam performance include not only the beam angle generated by the wedge, but also transducer frequency and element size. The optimum beam angle will generally be governed by the geometry of the test piece and the orientation of the discontinuities that the test is intended to find. Transducer
frequency affects penetration and flaw resolution. As frequency increases, the distance the sound wave will travel in a given material decreases, but resolution of small discontinuities improves. As frequency decreases, the distance the sound wave will travel increases but the minimum detectable flaw size will become larger. Similarly, larger element sizes may decrease inspection time by increasing coverage area, but the reflected echo amplitude from small discontinuities will
decrease. Smaller element sizes will increase reflection amplitude from small discontinuities, but the inspection may take longer because the smaller beam covers less area. These conflicting factors must be balanced in any given application, based on specific test requirements.
Some specific angle beam recommendations can be found in ASTM standard E-164, "Standard Practice for Contact Examination of Weldments", and in the AWS Structural Welding Code, section 6. Although both of these documents are written as guidelines for weld inspection, the basic principles they describe can be applied to many other applications that involve testing metal products for cracks or similar discontinuities. Test procedures generally require verification of
basic functional parameters such as sensitivity, zero offset, beam index point, and refracted angle through the use of an IIW reference block or similar reference standard before beginning testing.
In cases where no code or procedure has been specified or generated for an inspection, angle beam assemblies should be selected based on a trained inspector's evaluation of reference standards of the part in question that contain known defects or artificially induced flaws. Appropriate reference standards will allow the inspector to choose the combination of transducer and wedge that provides the best and most reliable response in a given application.
Integral angle beams (one-piece transducer/wedge assemblies) are sometimes used for convenience. The use of snap-in versus threaded transducers is strictly a matter of preference with no functional effect on performance.
Testing materials other than steel
Unless otherwise specified, standard wedges are designed to generate shear waves at a designated angle in steel with a shear wave velocity of approximately 3,250 m/S or 0.1280 in/uS. Because the refracted angle varies with the sound velocity of the medium, wedges designed for steel will generate different refracted angles in other materials. Wedges designed for use on aluminum are available as a standard product. For other materials, special wedges must be quoted on a custom
basis.
Alternately, it is possible to calculate the refracted angle that will be generated by a standard (steel) wedge on other metals through a simple formula based on Snell's Law:
|
Sin θ 1 | |
V 1 | |
--------
|
=
|
-----
| |
Sin θ 2 | |
V 2 |
where
θ 1 = nominal angle of wedge
θ 2 = refracted beam angle in test material
V 1 = nominal shear wave sound velocity in steel (3,250 m/S or 0.1280 in/uS)
V 2 = shear wave velocity in test material
In the case of nonmetallic materials whose sound velocity differs greatly from steel, such as plastics or ceramics, the refracted wave may exist in a mode other than shear. In slow velocity plastics the refracted wave will be longitudinal, and the longitudinal velocity of the plastic should be used for the value of V2 in calculating refracted angle. In high velocity ceramics, most sound energy may be converted to a surface wave. Consult Olympus IMS for assistance in selecting
wedges for materials other than metals.
Contoured wedges
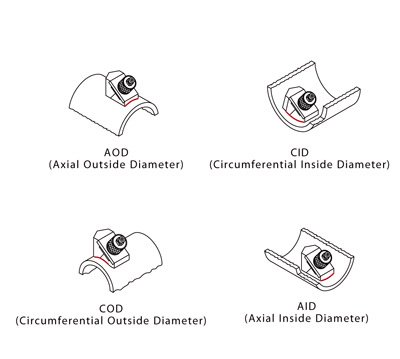
Contoured or radiused wedges are recommended when testing small diameter pipes and tubes and other curved test pieces in order to maintain optimum sound coupling. As curvature increases, proportionally less of the wedge surface is in contact with the test piece, which both reduces the amount of sound energy coupled in and out of the part and increases the amount of noise reflected from the couplant layer. Wedges may be contoured in four ways:

The IIW Handbook on the Ultrasonic Inspection of Welds recommends the use of a contoured wedge whenever the gap between the wedge and the test surface exceeds 0.5 mm (approximately 0.020 in.). Under this guideline, a contoured wedge should be used whenever part radius is less than the square of a wedge dimension (length or width) divided by four:
where
R = radius of test surface
W = width of wedge if testing in axial orientation, length of wedge if testing in circumferential orientation
Of course switching to a small wedge, if possible within the parameters of inspection requirements, will improve coupling on curved surfaces. As a practical matter, contouring should be considered whenever signal strength diminishes or couplant noise increases to a point where the reliability of an inspection is impaired.
For any style and size of wedge there will be a minimum possible contour radius in each of the four orientations, based on the amount of wedge material that can be removed without impairing performance. Detailed guidelines are available.
Focused dual element angle beams
The vast majority of angle beam assemblies use single element, unfocused transducers. However, in some tests involving highly attenuating or scattering materials such as coarse grain cast stainless steel, focused dual element angle beams are useful. Because they have separate transmitting and receiving elements, dual element transducers can typically be driven at higher excitation energies without noise problems associated with ringdown or wedge noise. Focusing permits a higher
concentration of sound energy at a selected depth within the test piece, increasing sensitivity to discontinuities in that region. Contact us further information on focused dual element angle beams.
High temperature wedges
Standard angle beam assemblies are designed for use at normal environmental temperatures only. For situations where metal must be inspeced at elevated temperature, special high temperature wedges are available. Some of these wedges will tolerate brief contact with surfaces as hot as 480° C or 900° F. However, it is important to note that high temperature wedges require special attention with regard to the sound path they generate. With any high temperature wedge, sound
velocity in the wedge material will decrease as it heats up, and thus the refracted angle in metals will increase as the wedge heats up. If this is of concern in a given test, refracted angle should be verified at actual operating temperature. As a practical matter, thermal variations during testing will often make precise determination of the actual refracted angle difficult.
|
 Angle beam assemblies, consisting of a transducer and a wedge, are extremely important to the field of ultrasonic nondestructive testing, commonly used in a wide variety of weld inspection applications and also for detection of cracks oriented perpendicular to the surface in metal plates, pipes, billets, and forgings, as well as machined and structural components. This paper
is a brief review of the theory of angle beam testing, along with some notes and tips intended to assist users.


