Abstract: Industrial quality assessment tasks
Function often relates to form, and this holds particular truth within the world of manufacturing. Undergoing rigorous quality assessment procedures ensures that components are manufactured according to their precise specifications, before being assembled into the fully functioning whole. These assessments might include many tasks such as geometric product specifications (GPS), fracture analysis and surface roughness testing, and form the core of quality control in many manufacturing processes. As such, identical tasks may be performed across industrial sectors as diverse as medical engineering, electronics and the automotive industry.
Techniques commonly used to accomplish tasks in quality assessment include contact profilometry and traditional light microscopy, and these demand a high level of accuracy in both inspection and metrology. Although these successful approaches are heavily relied upon within industrial quality assessment, the novel approach of opto-digital microscopy is becoming an increasingly popular solution, bringing industrial quality control into the digital era.
This white paper explores the limitations of existing approaches to quality assessment within industry, and details how opto-digital technology can be used as a more efficient alternative. To outline how any type of product consisting of moving parts depends on a diverse set of specifications, we use the theoretical example of the humble miniature music box. This brings together many different tasks commonly used for quality assessments within industry, and we use it to illustrate where specific benefits are afforded by new opto-digital technologies. The hearing aid medical device provides a second example of this, in the context of a real life technical application. These two examples show how, when complemented by traditional approaches, opto-digital technology can improve the success of quality assessment tasks within almost any manufacturing environment.
‘Opto-digital microscopy’ at a glance
- Builds on the strengths of light microscopy
- Intuitive operation and visualisation
- Presents an efficient alternative to traditional methods
- Brings industrial quality control into the digital era
- Manages the complete analysis, measurement and reporting workflow
Solutions
- The choice of several advanced techniques
- Best image function merging different techniques
- Intuitive touch operation and on-screen display
- 2D and 3D display and analysis
- Optical profilometry with confocal laser scanning microscopy
Key words
- Industrial quality control
- Opto-digital microscopy
- Surface metrology
- Geometric product specifications
Conventional methods of quality assessment
Several methods are viewed as “gold standards”, widely used within industry for performing tasks of quality assessment. For dimensional metrology tasks, correct GPS may be investigated with calliper measurement tools, or instead with the coordinate measurement machine (CMM), which relies upon a mechanical or optical probe to measure in three dimensions, and display this information in mathematical form.
For surface metrology, the most common approach within industrial quality control is that of contact profilometry using the stylus-based surface roughness gauge. However, this approach incurs several limitations, such as physical damage to the sample, and these will be discussed in more detail in the context of our specific examples. An alternative technology is interferometry, which instead uses waves to measure surface irregularities. This method is fully traceable but complex, and requires much training and expertise in optics and light phases. It is also very niche, limited to surface metrology of certain types of samples such as mirrored surfaces. Other specialised applications employ the techniques of atomic force microscopy (AFM) and scanning electron microscopy (SEM), for metrology on the nanometre scale. AFM is a type of scanning probe microscopy that scans a sample surface using a physical probe, while SEM scans the sample with a focused beam of electrons. However, these methods are of limited practicality in many industrial applications, being expensive and time-consuming. Only the most specialist applications require an atomic scale resolution, and the majority of tasks within industrial quality control benefit from more versatile methods.
Light microscopy is one such versatile method, used for rapid analysis in many tasks. This has been a mainstay since the early 1900’s, enabling the first wave of precision engineering, and was a truly progressive technology stemming from the industrial revolution. Its success is reflected in its persistence as a core technique, and opto-digital technologies now build upon this success.
Hitting the right note – the miniature music box
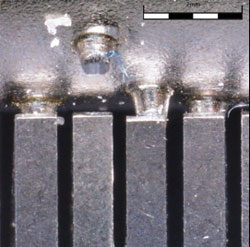 Figure 1: The miniature music box, where function depends on form, originating from several different aspects of the manufacturing process. | As with any product made up of moving parts, the performance of this miniature music box trinket, shown in Figure 1, depends on many different manufacturing specifications. This example details how opto-digital microscopy can be used in many ways to assess these specifications. The GPS describes the required form of the component. In this example, the position and diameter of drilling holes defines the assembly of individual components, while the height and position of pins defines the amplitude and sequence of the melody. The GPS would traditionally be measured using a CMM. However, opto-digital microscopy presents a more rapid approach with the added benefit of offering full documentation and measurement capabilities, with both 2D and 3D calliper measurements. |
Opto-digital microscopy — an accessible solution for advanced industrial inspection and measurement
Digital technologies are becoming the norm in many areas of our lives. Following this trend, the new category of microscope takes the best of both worlds from optical and digital technologies, for the efficient management of industrial quality control workflows.
Opto-digital microscopes are based upon modern microscopy techniques, controlled and displayed through a digital imaging interface to achieve a simplicity that is intuitive to any operator, regardless of experience. Accurate inspection and measurement no longer depends on in-depth microscopy knowledge, due to several innovative features in both the system and software design of the opto-digital microscope.
Rapid analysis enables much quicker decision-making compared to traditional techniques, and opto-digital systems provide a complete investigation, measurement and reporting platform. If the situation is particularly complex, the user can also complement this approach with further analysis, for example by AFM or SEM, if necessary.
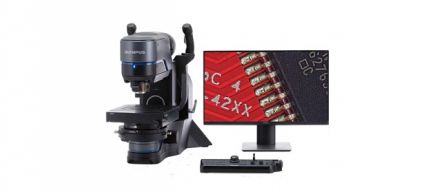
The opto-digital concept is being pioneered by Olympus, and currently consists of two types of microscope systems. For high resolution inspection and measurement, the Olympus DSX series provides opto-digital inspection and measurement solutions for a range of sample types. As an alternative to contact profilometry, the Olympus LEXT is a confocal laser scanning microscope (CLSM) optimised for surface imaging, optical profilometry and surface roughness measurement.
With both digital capture and display, the eye-piece has become a thing of the past. Working at the microscope over extended periods of time has always been uncomfortable, and the opto-digital microscope instead only displays the image on a monitor for comfortable operation. On-screen viewing is also much better suited for multiple users, for discussions or training.
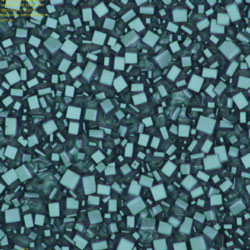
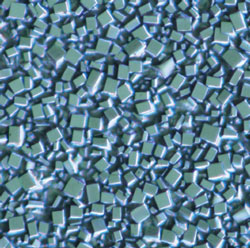
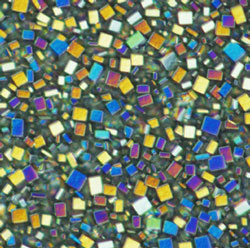
For operators who may lack the experience to know exactly when they should be using a certain technique or setting, Olympus has incorporated a unique “best image” function into the DSX series, providing an on-screen display of multiple capture settings, allowing the user to pick the most insightful imaging technique, as shown in Figure 2. This also presents an ideal resource for operator training. Since samples are shown captured using a range of optical techniques, a new operator can learn by example when to use a particular observation method. In addition to these standard observation methods, the highlight function points out specific features of interest in a chosen colour, whilst the remaining sample is shown in black and white. In the example of the diamond grinding disc shown in Figure 2, applying the highlight function with DIC observation helps to visualise the distribution of a diamond surface at a specific angle across the disc.
Reporting functions are also efficiently managed on the opto-digital platform. Documentation includes observation settings presented together with results, so analysis and measurement information can be rapidly fed back to R&D or production, or shared for training purposes.
So how are the benefits afforded by opto-digital technology transforming the future of industrial quality assessment? The following sections bring together a range of tasks reflecting standard quality assessment tasks used in many industrial sectors, highlighting how opto-digital microscopy can improve on both performance and efficiency.
 BF | 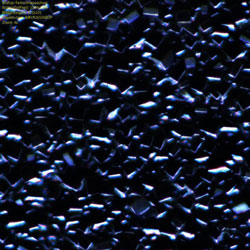 DF |
 MIX (BF + DF) | |
 DIC | 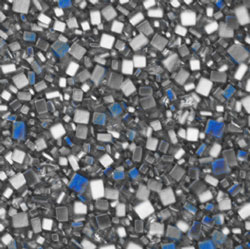 DIC WITH HIGHLIGHT |
Figure 2 the Best image function allows rapid acquisition of the best imaging technique required for inspection and/or measurement. With the Olympus DSX opto-digital microscope, this diamond grinding disc is viewed using: bright field (BF), dark field (DF), MIX (combined bright field and dark field), differential interference contrast (DIC) and polarised light. The highlight function visualises the distribution of specific diamond particles.
1. Detailed inspection
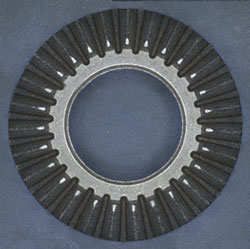
Drawing on the benefits of digital functionality, larger samples such as the gearing within the music box can be inspected with opto-digital microscopy, instead of traditional stereo microscopy. The field of view is vastly expanded with a stitching function to automatically assemble hundreds of individual capture areas into a single image, which can then be observed on-screen. Figure 3 shows an example of this using the DSX opto-digital microscope. Furthermore, the 2D image is completely in focus due to the extended focal image (EFI) function, which uses the fine focus adjustment to combine many in-focus images from along the Z-axis. The 3D image composition function can also be combined with a panoramic stitching view to construct a wide-field 3D image that can be rotated, expanded and reduced on the digital screen view.
 A | 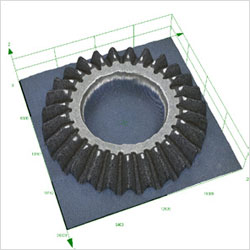 B |
Figure 3: panoramic image stitching functions with the Olympus DSX opto-digital microscope allows high resolution capture of larger samples. This is possible for both 2D visualisation (A) with a completely in-focus image using the EFI function. This can also be viewed in 3D for inspection at any angle (B).
2. Surface roughness
Surface metrology is important throughout many areas of manufacture, as surface irregularities have the potential to form nucleation sites for cracks or corrosion. Surface roughness also provides insight into friction forces between two surfaces, which promotes adhesion. This latter attribute is of particular importance in example of the music box, as it affects contact mechanics such as gearing, and in turn defines the speed and rhythm of the music box melody. Contact profilometry is most commonly used to determine surface roughness. However, measuring surface roughness is a function in which the CLSM really comes into its own as an optical profilometer. Firstly, a CLSM only detects in-focus reflections from a single specified focal plane, and this can be used to generate height information. Using the CLSM as an optical profilometer, it is the laser that scans the surface, as opposed to the stylus in traditional contact profilometry, and this brings with it several major benefits. The diamond tip of a stylus dragging over the surface can scratch and damage softer materials. Furthermore, with adhesive samples, the stylus may be damaged when it pulls loose, making it impossible to achieve correct results. Contact surface roughness gauges are also unable to measure contours less than the stylus tip diameter (a radius of 2 μm), whereas the laser of the LEXT can measure down to a radius of only 0.2 μm. Analysis takes only a few seconds, much faster than stylus-based systems.
Optical profilometry is becoming ever more widely used within industry, especially now that the Olympus LEXT conforms to the first ever GPS standard for 3D surface metrology, ISO25178. This new standard defines 3D surface texture parameters, and also describes associated specifications such as the measurement technologies, calibration methods and software.
3. Inspecting for defects
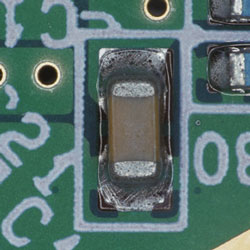
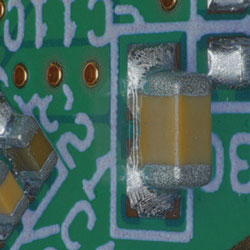
The inspection of probes is facilitated by the unique, free-angle tilting function of the DSX, which allows easy sample inspection of different facets at various angles, without touching the sample. The performance of the e.g. hearing aid hinges on a miniature printed circuit board (PCB), defects in which would interfere with function. Figure 4 shows how this tilting function assists in the inspection of the PCB, such as that within the hearing aid. Previous inspection methods, e.g. with the traditional stereo microscope, would likely miss defects that were previously hard to see or even hidden, but can now be easily observed with a different viewpoint.
 DIRECTLY ABOVE | |
 LEFT 45° | 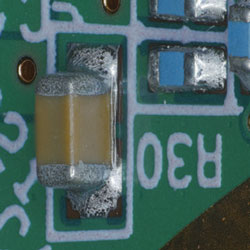 RIGHT 45° |
Figure 4: The sample can be inspected from multiple angles with the free-angle tilt capability of the Olympus DSX opto-digital microscope, so defects are no longer hidden.
4. Analysis through transparent layers
Inspection of the PCB can also be hampered by the presence of transparent layers covering the surface. The laminate layer obscures the underlying surface, and a sharp image cannot be obtained with standard optical microscopy. Opto-digital technologies incorporate microscopy techniques such as polarised light illumination, reducing reflection from this top laminate layer, and allow accurate inspection of the PCB, as shown in Figure 5.
 A |  B |
Figure 5: Flexible printed circuit board, where the overlying laminate layer obscures inspection when using bright field illumination (A). Polarising light illumination reduces reflection from the laminate layer, achieving a sharp image of the underlying surface (B).
Technical application: the hearing aid interconnect
The operation of miniature medical devices depends on manufacturing to precise specifications and accurate GPS, and this is true in this example of a hearing aid device for amplifying and modulating sound. There are a number of tasks required in the quality assessment of this medical device, including inspection of the interconnect, a tiny electrical connection feature two to three millimetres across. Inspection should also accurately identify, for example, whether the two parts of the interconnect fit together, and remain in contact.
Conclusion
In recent years, microscopy techniques have been rapidly advancing in both performance and complexity. Opto-digital microscopy technology benefits from these developments, and makes them accessible for operators at every level of expertise, allowing them to fully focus on the inspection task. As such, opto-digital technologies are ideal for the management of complete industrial quality control workflows, streamlining the imaging, measurement and reporting stages of many tasks through rapid and intuitive operation.
Faster analysis enables faster decision making, and opto-digital presents a more efficient means of quality control, compared to traditional techniques. In more complex situations, opto-digital microscopy also presents a quick and cost-efficient starting point, indicating whether other more specialised analyses such as AFM or SEM are necessary, ensuring this investment of time and resources is fully justified.
Opto-digital technology is really taking hold within industrial quality control, especially now that for profilometry applications, the LEXT conforms to the first ever standard for 3D surface metrology, ISO25178. It is therefore conceivable that within the next few years opto-digital technologies will become standard quality control tools within many industries, bringing industrial quality control into the digital era.


