Airbags are one of the most important advancements in automobile safety. In an accident, the airbag rapidly inflates to help arrest the movement of the driver and passenger(s).
In a steering wheel, the airbag is mounted inside a housing. The airbag is concealed behind a set of molded plastic covers that need to work correctly and look good. Essential to this functionality is the cover’s tear seam.
How the thickness is measured
The Magna-Mike® 8600 thickness gage works on a principle called the Hall effect. Hall effect sensors respond to changes in a magnetic field by varying voltage as an electric current passes through it. In thickness gaging applications, a Hall effect sensor is incorporated into a small probe along with a strong magnet that creates a magnetic field around the sensor. A target, such as a steel ball, bends the magnetic field. The closer the target gets to the probe, the more the magnetic field bends. As the distance between the target and probe changes, the voltage across the Hall effect sensor varies in a predictable way. This change in voltage is used to calculate the thickness reading. In this application, the probe tip is held on one side of the seam, and the target is placed on the other side—the distance between the probe and the target represents the seam’s thickness.
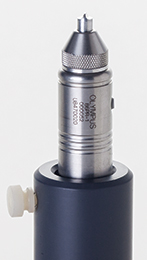
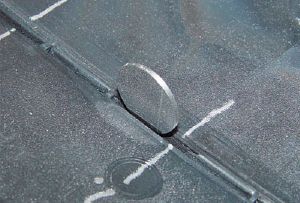
Because of the seam’s shape, we created a special probe tip (86PR1-CWC) and target disk set (80TD1 and 80TD2) to help ensure accurate thickness measurements. The probe used in this application has a narrow, pointed tip designed to fit into the airbag tear seems. The 80TD1 target disk is sharp edged, and it’s designed to fit into V-shaped seams. The 80TD2 target disc has a square edge, making it ideal for flat seams. |  A chisel tip wear cap is ideal for airbag seam inspection. |
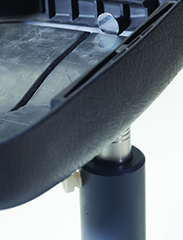
When making measurements, the probe is usually placed on the outside of the airbag cover and the target disk is placed on the inside, making it possible to freely move the probe. It’s important that the disk remains aligned with the probe tip and that both the probe and the disk are in firm contact with the seam’s surface to ensure an accurate thickness measurement. With proper calibration and target disk orientation, you can expect a measurement accuracy of +/- 3% (or better). |  Measuring the thickness of a seam. |
Products Used in This Application
Magna-Mike 8600 thickness gage
80TD1 and 80TD2 target disk set
Related Content
3D Evaluation of Automobile Door Switch Embossing Using the LEXT OLS5000 Laser Microscope
Inspection of Machined Holes on Automotive Fuel Injection Valves
Get In Touch


