Our OmniScan MXU 4.4 software works with OmniScan flaw detectors and OmniPC™ software to help make inspections even more efficient. Check out four new features that help speed up your weld inspection workflow from scan plan, to analysis, to reporting.
1. Create a compound scan onboard your flaw detector
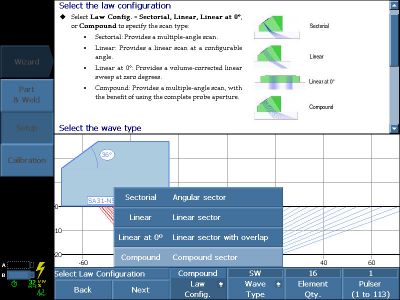
Compound S-scans help reduce the number of groups and scans required during an inspection and increase the volumetric coverage of welds using a single phased array probe. Being able to create compound scans directly in the flaw detector makes it simple to set up the scan without having to use a PC, speeding up the overall inspection. On a single group instrument, such as an OmniScan SX flaw detector, a compound scan can reduce the number of acquisition scans per day by a factor of two or more compared to the equivalent coverage using a sectorial scan.
 |
| Configuring a compound scan law in the MXU software’s setup wizard. |
2. Simplify long seam weld inspection with curved ray tracing geometry and a focal law calculator
The MXU 4.4 software enables users to create setups for long seam weld inspection directly on their OmniScan flaw detector without the need of a laptop computer.
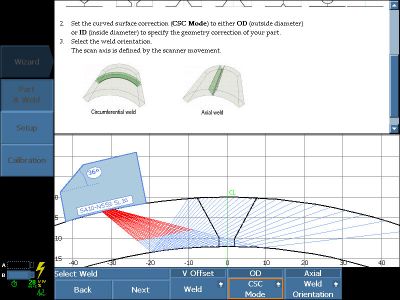
- With the calculator feature, inspectors can use a custom COD wedge or standard wedge from the OmniScan wedge library. The calculator will generate the correct focal laws for the defined part curvature based on the user’s input, leading to fewer configuration steps and fewer chances for user error.
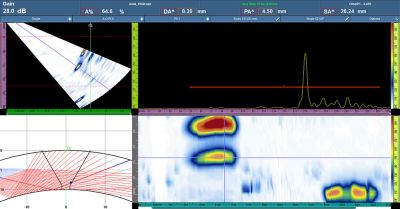
- The A-C-R-S layout helps users visualize defects within a curved part. The R-scan will show the corrected position in the part according to the signal in the gate and correlate with the ultrasound signal from the A-scan and S-scan.
 |
| Using the MXU software’s part and weld wizard to define a curved part; image shows the ray tracing representation. |
 |
| The A-C-R-S layout representation and R-scan defect positioning (also available for parts with flat geometry). |
3. New readings
The MXU 4.4 software offers new readings that support common defect evaluation measurements. The measurements include aspect ratios that compare the dimensions of a particular flaw to other known measurements. Currently, these calculations are performed by hand, so this feature will help save users time and improve overall inspection efficiency.
- Scan length corrected for part curvature and flaw depth: S(m-r)CSC
- Time-of-flight readings that refer to the position of ultrasonic cursors in the part in microseconds: (TOF:U(r), TOF:U(m), and TOF:U(m-r))
- Aspect ratio readings that are calculations of the defect height to the length of the indication or height of the defect: (h/l Ratio, h/t Ratio)
4. DGS calibration for conventional ultrasound and phased array
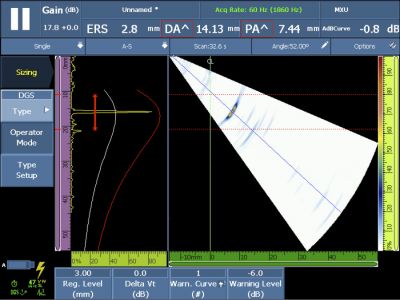
The DGS calibration offers an alternative sizing method to the DAC and TCG techniques and uses mathematical formulas to perform the calibration, helping save time and streamline the calibration process. To work correctly, DAC and TCG require expensive calibration blocks made from the same material as the part you're inspecting. The calibration block also must have reflectors at various depths. With DGS, the calibration block requires only a single known reflector.
DGS is available for both conventional ultrasound and phased array. In the past, phased array calibration was limited to the angles 45°, 60°, and 70°. With the updated MXU software, all angles are now calibrated, and the DGS reference curve is available on all angles.
 |
| The screen shows the calibrated DGS and the list of parameters available for making live adjustments after you complete the calibration wizard. |
If you already own an OmniScan MX2 or OmniScan SX flaw detector, you can download MXU 4.4 software now.
Editors note: This post was modified in March 2017 to reflect updates to the software.
Get In Touch
.jpg?rev=F1DB)
