Bar Inspection System (BIS)—Phased Array

개요
The bar inspection system (BIS) is a turnkey solution that uses phased array probes integrated into a fully automated testing system to meet stringent quality control standards while maintaining productivity. Key benefits include:
Full Volume Inspections—Detect Internal and Subsurface Defects
Phased array (PA) probes can be programmed to alternate between longitudinal and shear wave to inspect both the volume and subsurface of a bar. The probes can be positioned and fired so that the entire bar cross-section is inspected as it moves through the system.
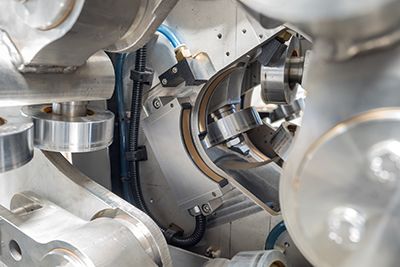
Probes are grouped for specific diameter/size ranges and bar shape on the same probe holder (cassette), helping ensure full-volume inspection and minimizing crosstalk and change over time. The cassettes are equipped with high-pressure water jets to remove particles and bubbles from the probes.
Fast Inspection, Repeatable Results
Our high-speed inspection systems are designed to meet the productivity requirements of the metal manufacturing industry. The systems adhere to the highest international quality standards, without compromising productivity.
Floating Head Design
The bars pass through an immersion tank that contains a floating inspection head. Because the probes are inside a tank with a large amount of undisturbed water, it provides ideal coupling conditions.
The probes are fixed to the floating head, and the head dynamically follows the bar. This system keeps the probes perpendicular to the bar’s centerline, despite variations in straightness, helping ensure accurate, repeatable inspection results, even for small defects.
Automatic Calibration
To achieve a thorough inspection, each phased array probe must be calibrated. During calibration, the apertures of each probe pass over a known defect, and the probe’s gain level is automatically adjusted. This feature enables users to easily perform and validate a precise calibration of each focal law, saving time without relying on the user’s skill.
- All probes can be calibrated in a single automatic sequence
- Calibration check performed under normal production conditions
- Each reference defect is validated to help ensure they’re detected above the alarm level
- Results are displayed in easy-to-interpret views
Software, Probe Holder, and Acquisition Unit
The combination of phased array probes, a powerful acquisition unit, and advanced software work together to deliver a powerful, easy-to-use inspection system.
Maximize Your Uptime
Probes for different bar diameters are all mounted on a single probe holder (cassette). This makes it easy to electronically change probes based on the bar’s diameter without having to manually connect or disconnect them.
Phased Array Acquisition Unit
The QuickScan™ PA 32:256 module meets IP55 standards and is designed to easily integrate into industrial environments.
Easy Setup
The software’s wizard makes it simple to create setups for each part size. The inspection configuration and calibration parameters for each bar diameter are saved and easily retrievable. The final results are merged and displayed to clearly differentiate between accepted and rejected tubes.
- Quickly access predefined inspection setups
- Restrict access to certain users to help minimize operator errors
- Calibration and inspection information are stored for traceability
- System can be integrated within your inspecting application, facilitating an operating mode that requires minimal human intervention


