Crude oil is an important source of energy, but using it in its natural form is inefficient and possibly dangerous. Because of this, refineries turn crude oil into finished petroleum products.
The refining process starts with heating the crude oil and putting it into a distillation column (also known as a still). In the still, diesel, gas, and other products boil off and are recovered at different temperatures. The distillation temperature for petroleum products ranges from as low as 30 °C (85 °F) to greater than 565 °C (1,050 °F). These high surface temperatures make inspecting refinery equipment challenging.
Challenge: Too Hot to Handle
Periodic thickness measurements using ultrasonic testing (UT) are needed to monitor for corrosion and other defects, which can cause equipment failure to potentially shut down the refinery’s operation. Since the refining process runs continuously, the machinery can’t be cooled down without stopping the entire process. But high surface temperatures can easily destroy a thickness gage transducer; many can only tolerate temperatures up to about 50 °C, or 125 °F.
Solution: Transducers That Can Take the Heat
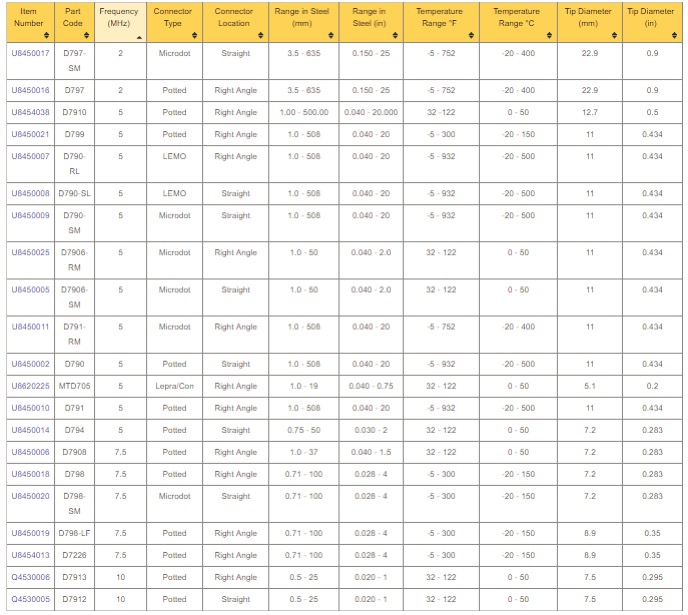
Unlike traditional UT transducers, dual element transducers have delay material that acts as insulation between the active transducer element and the hot test surface. They’re frequently recommended for high-temperature applications because some—such as the D790—can be used on surfaces as hot as 500 °C (930 °F) with intermittent contact (5 seconds or less).

Corrosion gaging duals with temperature specifications.
Challenge: Changing Sound Velocity
Accurate UT thickness measurements depend, in part, on the velocity of sound in the test material. As a material’s temperature increases, the sound velocity decreases, complicating the accuracy of the thickness readings. According to ASTM E797-95, the sound velocity of carbon steel decreases by “about 1% per 55 °C (100 °F)” increase in temperature.
To get around this problem, some inspectors will calibrate their flaw detector or thickness gage on a hot test block. To heat the block, they’d hold it to the pipe or tank being tested. However, this process is slow, and the temperature of the block wouldn’t exactly match the test material, causing imprecise measurements.
An alternative method is to take the thickness measurements and then manually calculate a correction based on the part’s thickness and temperature. This technique is time consuming, and the operator is not able to see the true thickness reading during the inspection.
Solution: Automatic Temperature Compensation
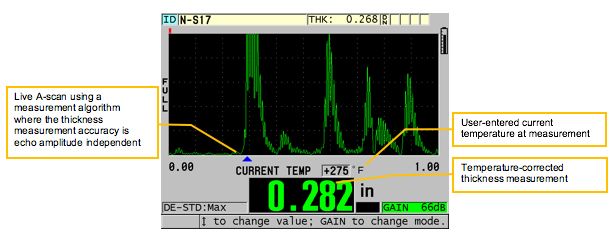
Our predecessor, Panametrics NDT, pioneered a solution to this challenge nearly 15 years ago. Today, the 38DL PLUS® ultrasonic thickness gage includes Temperature Compensation software (as a standard option) that enables you to calibrate the gage at room temperature and then simply input the elevated temperature of the material being tested. The gage will automatically compensate for the velocity change and display the temperature-compensated thickness. The software is easy to use and requires little effort to set up, so you can calibrate quickly and receive real-time temperature-adjusted measurements. It’s that simple.
Related Content
8 Tips to Improve Your High-Temperature Corrosion Thickness Measurements
High-Temperature Ultrasonic Testing
Ultrasonic Thickness Measurements of Hot Metals
Introduction to Thickness Gaging
Get In Touch


