Evident LogoOlympus Logo
블로그

정확한 미세홀 튜브 측정을 위한 3가지 팁

저자  -
정확한 미세홀 튜브 측정

Small-diameter metal and plastic tubing is used in a wide variety of industrial and medical applications. Some of these tubes can be smaller than 0.125 inches (3 mm) in diameter, with very thin walls. When their applications are safety-critical, they need to meet tight manufacturing tolerances for wall thickness and concentricity. In the past, manufacturers would have to cut the samples to visually inspect the tube or measure the wall thickness using calipers. Today, there’s a fast and nondestructive alternative for quality control inspections of small-diameter tubing, ultrasonic (UT) thickness gaging.

Recommended UT Thickness Gage, Equipment, and Inspection Setup

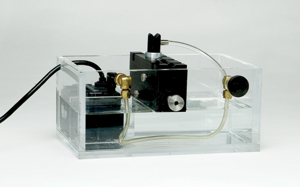
For tubing with a diameter of less than 0.125 in. (3 mm), we usually recommend using a 20 MHz focused immersion transducer. To efficiently transmit sound energy into a small-diameter part, it’s necessary to focus the sound into a narrow beam. Focused immersion transducers use a contoured acoustic lens along with a column of water to focus the sound beam for increased sensitivity. The RBS-1 bubbler is a desktop immersion-tank and probe fixture that creates a steady column of water and helps keep the test piece centered in the sound beam. To create a consistent, low-flow water column, the immersion tank must be used with one of the bubbler nozzles, which should be matched to the application. A B103 V-notch bubbler simplifies tubing concentricity checks, since it enables you to rotate the tubing to quickly measure the thickness around the entire circumference and slide the tubing over the probe to measure the thickness along the length of the part.

B103 V-notch bubbler with the RBS-1-15 recirculating bubbler system

We recommend using an Olympus 38DL PLUS® or 45MG ultrasonic thickness gage (using the 45MG-SE single element and 45MG-WF waveform software options) along with a 20 MHz M316-SU immersion transducer with a 0.75 in. (19 mm) focus for this application.

Small-diameter tubing inspections can be easy when using the proper equipment and correctly calibrated instruments, but measurement errors may still occur. Here are 3 simple tips to help you avoid common issues.

  1. Use the IF Blank function to avoid the interface echo trailing edge

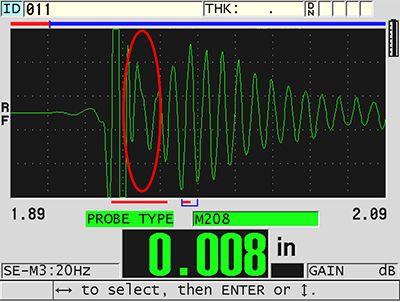
    When measuring steel tubing with an immersion setup, it’s important to account for the water-to-steel interface echo. The acoustic impedance of water and steel are sufficiently different that they create an impedance mismatch, which results in a large interface echo. Thin-walled tubing creates back wall echoes that are very close together. In most cases, the trailing edge of the interface echo interferes with the first returning back wall echo. To avoid this interference, use the IF Blank function, which conceals the trailing edge of the interface echo, and choose a pair of clean successive echoes that are further out in time and interference free.

    The trailing edge of the large interface echo interfering with the first back wall echo
    The trailing edge of the large interface echo interfering with the first back wall echo

    The IF Blank setting can be adjusted to select the strongest pair of signals. Although the selected pair of signals changes as the IF Blank is adjusted, the time of flight between successive back wall echoes remains the same.

  2. Varying IF Blank settings results in the same thickness measurementVarying IF Blank settings results in the same thickness measurementVarying IF Blank settings results in the same thickness measurement
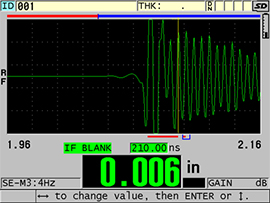
    Varying IF Blank settings results in the same thickness measurement
  3. Watch for varying back wall signal amplitude when using a focused immersion transducer

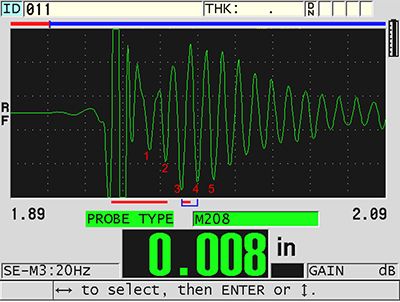
    Because the water path length in the B103 bubbler plus the metal wall thickness of the part is significantly shorter than the transducer’s focal length, the largest echo amplitude occurs around the third or fourth multiple of the back wall echo, where the focus occurs. This effect is common when measuring thin metal, and it should not affect accuracy if the measured echoes are clean and undistorted, as seen here. To take an accurate measurement, use the IF Blank function to select two successive, distinct back wall echoes.

    3rd and 4th multiples are the highest amplitude due to the focal length
    3rd and 4th multiples are the highest amplitude due to the focal length
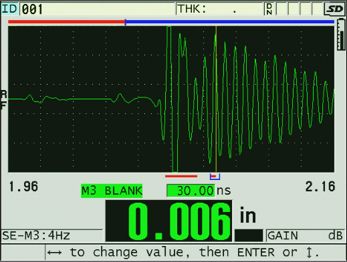
  4. Don’t set the M3 Blank out too far

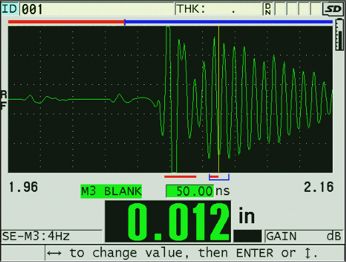
    To avoid a false measurement, decrease the M3 Blank value until the gage records a measurement using successive back wall echoes, correctly representing the part thickness.

    Detection between the 3rd and 5th back wall echoes
    Detection between the 3rd and 5th back wall echoes

    With the proper techniques, measuring wall thickness of thin-walled tubing is fast and simple with the 38DL PLUS and 45 MG ultrasonic thickness gages. For information on other thickness gaging applications, check out the links below.

    Detection between the 3rd and 4th back wall echoes
    Detection between the 3rd and 4th back wall echoes

Related Content

The (Sono)pen Is Mightier: 3 Tips to Improve Your Measurements

On the Cutting Wedge: Using Contoured Wedges to Inspect Welds in Small-Diameter Pipes

2 Challenges of High-Temperature Thickness Gaging and How to Solve Them


Get In Touch
전속 작가

Sarah Williams는 거의 10년 동안 방송 산업에서 연구자 및 카피라이터로 일했습니다. 이제 Sarah는 작가 및 편집자로서 역량을 발휘하여 Evident의 다양한 비파괴 검사(NDT) 솔루션과 관련된 주제에 관해 흥미롭고 뛰어난 자료를 작성하고 있습니다. 그녀는 최신 원격 육안, 현미경, 초음파, 와전류 및 위상 배열 기술에 관한 글을 씁니다. 또한 이러한 기술의 응용 현황과 더불어 우리의 삶의 질과 세상의 안전을 향상하는 데 이러한 기술이 어떻게 기여하는지를 탐구합니다. Sarah는 파트너인 David 및 세 자녀 Sophie, Anouk 그리고 Éloi와 함께 퀘벡에 있는 사무실에서 근무하고 있습니다. 

4월 23, 2019
죄송합니다. 이 페이지는 해당 국가에서 사용할 수 없습니다.
InSight 블로그 가입하기
죄송합니다. 이 페이지는 해당 국가에서 사용할 수 없습니다.
아래 양식을 작성하여 원하는 내용을 알려주십시오.
죄송합니다. 이 페이지는 해당 국가에서 사용할 수 없습니다.