The Magna-Mike® portable Hall effect thickness gage is used to measure the thickness of plastic containers and other nonferrous materials. Unlike our other thickness gages, the Magna-Mike gage does not use ultrasound. Instead, it measures the magnetic field between the tip of a probe and a target, which can be a ball, wire, or disk.
These 5 tips will help ensure that you get the best possible measurement accuracy:
- Use the largest target ball, disk, or wire suitable for the application
The larger the target, the stronger the magnetic field. The stronger magnetic field allows for a higher degree of accuracy and a greater thickness range, as shown in the table below.
Note: For 86PR-1 and 86PR-2 probes, the Measurement Tolerance=[(accuracy x thickness)+(0.0001 in. or 0.003 mm)], for 86PR-3 probes, the Measurement Tolerance=[(accuracy x thickness)+(0.001 in. or 0.025 mm)]Targets Min Thickness Max Thickness Accuracy Basic Calibration Multipoint 86PR-1 and 86PR-2 Probes 1/16 in. (1.58 mm) ball (80TB1) 0.0001 in. (0.001 mm) 0.080 in. (2.03 mm) 4% 3% 1/8 in. (3.17 mm) ball (80TB2) 0.0001 in. (0.001 mm) 0.240 in. (6.1 mm) 4% 2% 3/16 in. (4.76 mm) ball (80TB3) 0.0001 in. (0.001 mm) 0.360 in. (9.1 mm) 3% 1% 1/4 in. (6.35 mm) ball (80TB4) 0.0001 in. (0.001 mm) 0.360 in. (9.1 mm) 3% 1% 3/16 in. (4.76 mm) magnetic ball (86TBM3) 0.160 in. (4.06 mm) 0.750 in. (19.05 mm) 3% 1% 1/4 in. (6.35 mm) magnetic ball (86TBM4) 0.160 in. (4.06 mm) 1.00 in. (25.4 mm) 3% 1% 0.500 in. (12.7 mm) flat disk (80TD1) 0.0001 in. (0.001 mm) 0.360 in. (9.1 mm) 3% 2% 0.250 in. (6.35 mm) V-edge disk (80TD2) 0.0001 in. (0.001 mm) 0.240 in. (6.1 mm) 3% 2% 0.045 in. (1.14 mm) dia. wire (86TW1) 0.0001 in. (0.001 mm) 0.500 in. (12.7 mm) 3% 2% 0.026 in. (0.66 mm) dia. wire (86TW2) 0.0001 in. (0.001 mm) 0.240 in. (6.1 mm) 3% 2% New 86PR-3 Low-Profile Articulating Probe 1/16 in. (1.58 mm) ball (80TB1) 0.0001 in. (0.001 mm) 0.080 in. (2.03 mm) 4% 3% 1/8 in. (3.17 mm) ball (80TB2) 0.0001 in. (0.001 mm) 0.240 in. (6.1 mm) 4% 2% 0.026 in. (0.66 mm) dia. wire (86TW2) 0.0001 in. (0.001 mm) 0.160 in. (4.1 mm) 3% 2%
For this reason, we recommend using the largest target that’s suitable for your application. The target should have a strong enough magnetic field to measure your thickest applications, which, in turn, will provide improved accuracy. However, the target should not be so large that it can’t fit into the corners and crevices of the part. In most cases, the geometry of the part will limit how large of a target ball can be used. In some instances, the compressibility or softness of the material may also limit the size of the target.
- Always perform a multipoint calibration
As shown in the above reference table, performing a multipoint calibration improves the calibration curve and the overall accuracy of the instrument no matter which target you’re using. When you perform a basic calibration, the instrument only has four calibration points (Ball Off, Ball On, Thin Shim, Thick Shim) to use for the calibration curve. By choosing to perform a multipoint calibration, where you add additional calibration points, the calibration curve is improved since the instrument has more calibration points to use.
- Perform a Q-Cal on a regular basis
It’s important to note that Magna-Mike thickness measurements can be affected by changes in the environment, including changes in temperature and magnetic fields.
The Q-Cal feature helps compensate for temperature changes in the probe and any changes in the ambient magnetic field around the instrument. You can easily perform a Q-Cal by first removing the target from the probe tip and then pressing the Q-Cal key on the instrument or the probe. We recommend doing a Q-Cal at least once every half hour with the target removed from the probe tip. If the instrument is being used in an area with a great deal of interference, you may choose to increase how often you perform a Q-Cal.
Since the Magna-Mike thickness gages use magnetic fields, they’re affected by the Earth’s magnetic poles. Because of this, we suggest that you always perform a Q-Cal with the probe in the orientation you’re planning to use it in. If the orientation changes, remove the target and perform another Q-Cal.
It’s also good practice to keep a reference standard of known thickness nearby that is similar in thickness to the parts you’re measuring. This way, you can periodically check the thickness of a reference standard to confirm that the instrument is still measuring within specifications. If it’s not, you should perform a Q-Cal and then check the reference standard again. If the reference standard is still not measuring within specification, perform a full multipoint calibration.
- Use the minimum capture feature
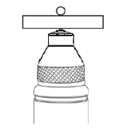
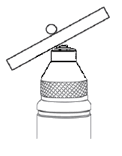
The minimum thickness measurement for a given location will always occur when the material being measured is perpendicular to the probe tip, and the target is centered over the top of the probe tip. Using the minimum capture feature on the Magna-Mike 8600 gage helps capture the true thickness while you’re maneuvering the part being measured. We suggest rotating the part in all planes to ensure that the target ball crosses the center of the probe tip, which correlates to the thinnest measurement.
Aligned
Correct Measurement
Misaligned
False Thicker Measurement - Reduce environmental interference
Your Magna-Mike thickness gage should not be used within 2 feet (0.61 meters) of any large steel object or strong magnetic fields. Having the instrument close to large steel objects, including table legs and steel supports, can affect the magnetic field around the probe. This introduces a deviation to the normal magnetic field between the probe and the target that was determined during the calibration process. This, in turn, leads to measurement drift and erratic readings. A Q-Cal may be able to help with this measurement drift but, in many cases, the instrument must be moved to a new location with less interference.
Related Content
Get the Most Out of Your Thickness Gage with Instructional Videos
A Look a Contact Lens Thickness: How Olympus Helps Manufacturers Keep Lenses in Shape
Through Thick and Thin: Using XRF to Measure Coating Thickness
Get In Touch
.jpg?rev=7E75)