Single Element Transducer Modes
How Do Ultrasonic Thickness Gauges Work?
Whether you want to learn the basics of ultrasonic thickness gauges or are looking for a more in-depth understanding of these devices, this guide explores their technicalities, modes of measurement, and key considerations. Ultrasonic thickness gauges can be used to measure a variety of materials, so having a better understanding of how they operate can help you perform more accurate, efficient tests.
How Do Ultrasonic Gauges Measure Thickness?
Ultrasonic gauges use the physics of sound waves to measure the thickness of a test piece. They do so by analyzing the pattern of how organized mechanic vibrations travel through metals, plastics, and other industrial materials and timing how long it takes to transmit a sound pulse through the test piece until it bounces back off an inside surface or a far wall. Usually, the longer it takes, the thicker the material. These ultrasonic devices use sound energy frequencies that are far higher than those that can be heard by the human ear. Audible sound usually occurs at around 20 KHz, but ultrasonic thickness gauges can operate at up to 500 KHz or even higher.
The transducers that transmit the sound pulses contain piezoelectric elements, which are excited by short electrical impulses. This generates ultrasonic soundwaves that pass through the test piece and reflect back to the transducer. Once the sound pulse comes back, it is converted from sound energy. The gauge uses this sound energy to calculate the thickness based on the following equation:
T = (V) x (t/2)
T = the thickness of the part
V = the velocity of sound in the test material
t = the measured round-trip transit time
Modes of Measurement
Single Element Transducers: Mode 1, Mode 2, and Mode 3
Once a sound pulse has been generated and echoes have been received, timing can be performed in a few ways. Three common methods to measure the time interval that represents the sound wave's travel through the test piece when using common contact, delay line, and immersion transducers are Mode 1, Mode 2, and Mode 3. The transducer type and application requirements usually determine which mode you choose.
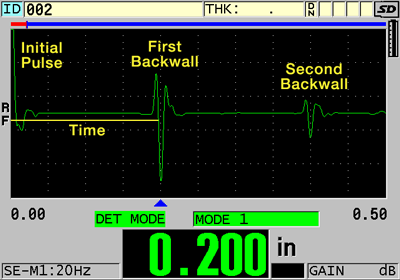
Mode 1 is the most common approach. It measures the time interval between the excitation pulse that generates the sound wave and the first returning echo and then subtracts a small zero offset value that compensates for fixed instrument, cable, and transducer wear plate delays.

Mode 1 is the normal measurement mode when testing with contact transducers. Its key advantage is that it typically offers the greatest maximum thickness capability. Since only a single back wall echo is required, it also has the best penetration capability in challenging materials like castings, low density plastics, and rubber. The disadvantages of Mode 1 are that the minimum measurable thickness will be higher than in other modes and accuracy can be slightly lower due to coupling variations. Also, the contact transducers associated with Mode 1 can be used only on materials with a surface temperature below 50° C or 125° F, so high-temperature measurement is impossible.
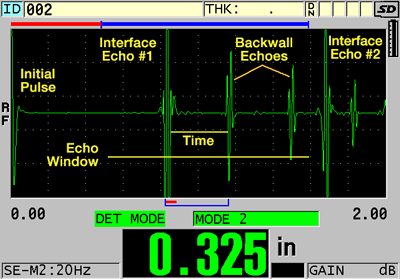
Mode 2 involves measuring the time interval between an interface echo returned from the near surface of the test piece and the first back wall echo, which represents one round trip in the test piece. This mode normally requires delay line or immersion transducers.

Mode 2 is often used to:
- Optimize near-surface resolution in plastics and composites
- Perform high-temperature measurements with high-temperature delay line transducers
- Take measurements on sharp radiuses using focused immersion transducers and focused or radiused delay line transducers
- Perform in-line measurement of moving material using immersion transducers
The main disadvantage of Mode 2 measurement is that maximum thickness is limited by delay line length.
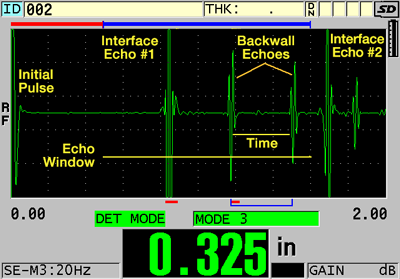
Mode 3 involves measuring the time interval between two successive back wall echoes, representing one round trip in the test piece using delay line or immersion transducers.

Mode 3 typically offers the highest measurement accuracy and best minimum thickness resolution, although the maximum thickness will be limited. This mode requires two or more clean multiple back wall echoes, which typically limits its use to materials of relatively low attenuation and high acoustic impedance like fine-grained metals, ceramics, and glass. Measurements can be made at high temperatures with appropriate high-temperature delay lines. Mode 3 also offers the advantage of removing thin nonmetallic coatings like paint from the thickness measurement of coated metals.
Dual Element Transducers
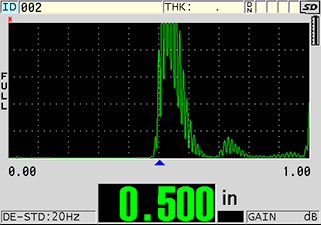
Dual element transducers incorporate separate transmitting and receiving elements mounted on delay lines that serve both as waveguides to aim the sound beam in a V-shaped path and as thermal insulators to protect the active element during high-temperature measurements. Echo timing is often performed in Mode 1 with a large zero offset to subtract the pulse transit time through the delay lines, as well as a trigonometric correction to compensate for the V-shaped sound path in the test material.

Ultrasonic Thickness Gauge Measurement Considerations
When measuring with ultrasonic thickness gauges, you must consider many external influences to ensure accuracy and safety. For more information, head to the following pages to learn about factors that affect ultrasonic testing and inspection conditions: