Positive material identification (PMI) plays a critical role in manufacturing, petrochemical production, and consumer products. It’s important to use the right metal or alloy in the right place, but also to make sure that there are no aberrations in the material’s composition (such as contamination with heavy metals). X-ray fluorescence (XRF) is an effective and easy-to-use method for component PMI to confirm that you’re using the right metal or alloy.
Handheld XRF is portable, requires minimal sample preparation, and gives you an answer quickly. For alloy identification — one of the most common applications of XRF — grade identification can often be made in as little as 1–2 seconds with our Vanta™ XRF analyzer.
Material Composition
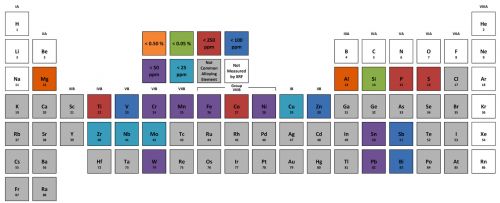
Handheld XRF is capable of quantifying more than 90% of the elements in the periodic table — from magnesium and heavier. This covers the vast majority of the elements used in commercial alloys. Figure 1 shows representative1 limits of detection for common alloying elements. With this detection capacity, XRF can make positive grade matches for aluminum alloys, stainless steels, chrome-moly alloys, many piping and flange materials, brasses, bronzes and other copper alloys, solders, titanium alloys, tool steels, and many so-called “super-alloys” based on nickel or cobalt.
Figure 1: Representative limits of detection for common alloying elements1.
Handheld XRF is not capable of directly measuring elements lighter than magnesium. This includes alloying elements such as lithium, beryllium, and carbon. These elements can be relevant in various applications, such as:
- Lithium in some aerospace aluminum alloys
- Beryllium in some copper alloys
- Carbon in many low alloy steels
Nevertheless, the grade of many of these alloys can still be identified based on the composition of their other alloying elements. However, if you need to quantify these light elements, other analytical methods are required.
Sample Condition
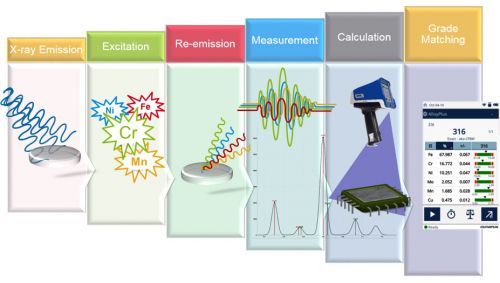
How XRF analyzers work can be summarized as: (1) X-rays are sent out; (2) X-rays come back to a detector; (3) complex math is used to processes the data; (4) grade identification (Figure 2). XRF is a surface measurement technique. In light alloys, such as aluminum, XRF can only measure the top few hundred microns of the sample. For main metals, such as iron or copper, it measures less than a hundred microns into the sample. And for dense materials, such as gold or lead, it only measures the top tens of microns. This means it is critical that the surface of the material accurately reflect the bulk composition. Surface contamination, such as paint, sealers, and galvanization, can dramatically skew the analysis. Likewise, residue from sandblasting or shot blasting, grinding, or even dirt can prevent positive material identification. It’s important that your sample is clean before testing it with XRF.
Figure 2: The process of positive material identification by X-ray fluorescence.
Handheld XRF analyzers utilize a low-wattage X-ray tube. Since the X-rays going out and coming back are low wattage, it is important that the analyzer is close to the sample. Ideally, the sample will be in direct contact with the instrument face. This can be challenging if your sample has a complex geometry, but Vanta analyzers feature a narrow profile, enabling the instrument to get very close to oblique samples, such as a flange welded to a pipe at 90 degrees.
Sample Surface Temperature
The X-ray physics of XRF are essentially unchanged by variations in sample temperatures. In addition, the Vanta XRF analyzer has been engineered for reliable performance independent of variations in environmental conditions. The instrument operates without thermal drift or deterioration of performance in operating temperatures between -10 °C and 50 °C (14–122 °F).2
Without modification, Vanta analyzers can measure samples at temperatures up to approximately 100 °C (212 °F). Above these temperatures, the Prolene film used as part of the instrument window is susceptible to damage. Olympus offers an alternative face plate for hot testing. This face place includes a Kapton window that enables the instrument to measure samples up to 315 °C (600 °F).
Conclusion
X-ray fluorescence is a powerful method for positive material identification. With its broad analytical capabilities and ease-of-use, PMI can be performed quickly and confidently. This not only helps prevent loss of production, but, more importantly, injuries or loss of life that can result from using the wrong component material.
[1] Limits of detection are affected by testing time, sample type, and the combination of interfering elements. These values are intended to be representative but may vary with samples and test conditions. They are provided simply as a guide.
[2] With an optional fan. The fan assembly is IP56 rated. Operates continuously at 33 °C without the fan.
Get In Touch
.jpg?rev=86DC)


