Cladded metals are increasingly being used across a wide range of industries, including oil and gas production, power generation plants, chemical, and even marine ship manufacturing. Cladded metals are mainly used to increase the cost-effectiveness of metal structures while preserving or increasing safety and durability.
Cladded metals
Two or more metals can be used in layers, and they usually complement each other. For example, one layer of metal might provide corrosion resistance, while the other maintains the required structural strength. This type of cladded metal combination is common in the offshore oil industry. Here, thin layers of Inconel® or super duplex alloy can be used in conjunction with carbon steel or stainless steel alloys. In other cases, the use of stainless steel layers on carbon steel structures is a compromise between increasing corrosion resistance and keeping cost at reasonable levels.
Possible metal combinations include titanium/carbon steel, titanium/stainless steel, aluminum bronze/carbon steel, stainless steel/carbon steel, nickel alloys/carbon steel, duplex or super duplex/carbon steel, aluminum/carbon steel, etc. The types of structures that can benefit from metal cladding include tube sheets, reactor vessels, heat exchangers, condensers, and more.
The welding process
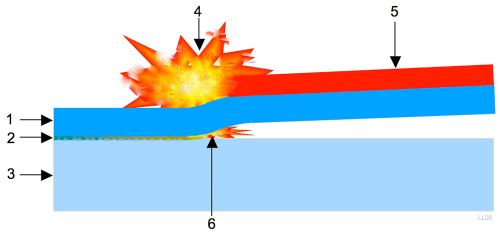
One method used for joining two metals is called “explosion welding” (EXW), also known as explosive cladding. Explosive welding is a solid state process that uses controlled explosive energy to bond two layers of metal together. The process begins with two metal plates or sheets. One sheet is typically made of a “conventional” metal, like carbon steel, and the other is a “high-quality” metal, like super duplex. Both sheets are cleaned to remove their oxide layers and then aligned on top of each other using plastic spacers. A frame containing explosive powder and a detonator is then placed on top of the sheets. When the explosion is triggered, it creates a strong pressure wave between the two metal sheets that expels any oxide layer and enables the metals to bond to each other atomically (Figure 1).
This process can be performed either in open air or in a vacuum dome.
Quality control
The explosive welding process has consequences on the quality and uniformity of the metallic bond. Fabrication defects can include micro shear cracks and disbonded areas.
While destructive testing methods are often used to reveal micro-cracks, disbond defects can be efficiently detected via nondestructive ultrasonic testing. Phased array ultrasonic testing with either a 64- or 128-element probe makes the inspection efficient, especially if the probe is mounted to a motorized scanner.
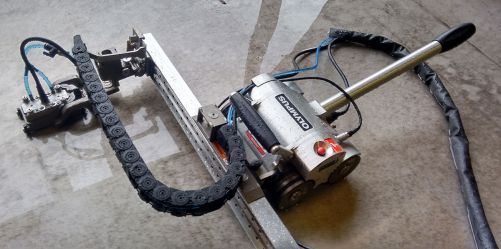 |
| Figure 2. An Olympus MapROVER™ motorized scanner. |
Using phased array to inspect cladded plates
In this example, an OmniScan® phased array flaw detector was used with a 7.5 MHz, 64-element phased array probe paired with a motorized scanner. The required detection sensitivity of this application was for 5 mm disbond areas. The probe and metal were coupled using a water column concept that eliminates the need for a wedge (the HydroFORM® solution). The entire assembly was then mounted on a holder and integrated into the scanner arm.
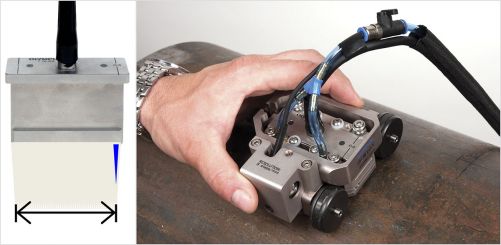 |
| Figure 3. The HydroFORM probe with illustrated sound beams (a), water box, and holder (b). |
The advantages of using a water path are good coupling during high-speed scanning and very good near-surface resolution (about 1.5 mm). Since, in this example, the cladding layer had a thickness of only 5 mm, good near-surface resolution is particularly important. Figure 4 (below) illustrates the schematics of sound propagation into the cladded part with the echoes generated by the water-to-metal, metal-to-metal, and metal-to-air interfaces visualized on a sectorial scan at 0-degrees.
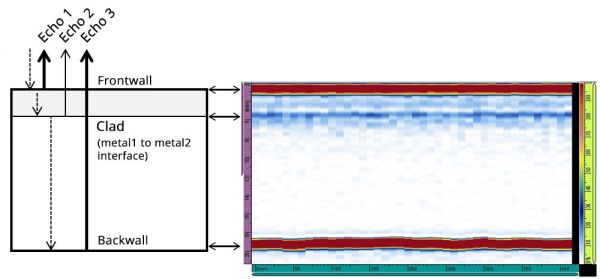 |
| Figure 4. The sound propagation (left) and echoes from the interfaces on a sectorial scan at 0-degrees (right). Size of scan modified from original. |
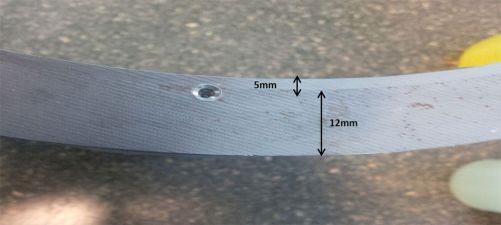 |
| Figure 5. An example of a cladded metal. |
The scanning process utilizes a motorized scanner with a 600 mm long raster arm solidly attached to the metal via four magnetic wheels. If a lower resolution is required, such as 5 mm, the data acquisition rate can reach 1016 mm/second. With the MapROVER scanner, the probe can travel along the raster arm at a speed of 900 mm/s and still clearly detect 5 mm wide disbonds. The different visualizations available on the OmniScan flaw detector help make it easy to identify the indications. While a thickness-coded C-scan enables clear positioning of the indications on the inspected plate, the B- and D-scans may help the operator in confirming the nature of the defect, such as if a disbond is located at the interface between the two metals or inside one of the two layers. For example, in Figure 6, an indication is clearly visible at the interface between the two different metals. Users can even configure the system to trigger an alarm if an indication is detected during the scan. In this example, the inspection covered a 600 mm × 4000 mm area in under 1 minute.
When the scan is complete, data reporting can be easily accomplished directly on the instrument or on a PC using OmniPC™ software.
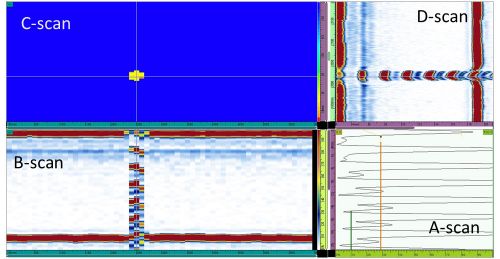 |
| Figure 6. Data acquired via an OmniScan flaw detector from a cladded plate. Note the indication at the metal-to-metal interface. |
Conclusion
Explosion welding methods are increasingly important in industries such Oil & Gas. The manufacturing process requires a fast and reliable method for testing the quality of the bonding between the two layers of metal. Phased array ultrasonic testing is an ideal inspection solution due to its speed and the quality of the data. When phased array is combined with a motorized scanner, users can achieve even greater inspection speed. In the example discussed here, the key benefits discussed include:
- Fast: a 600 mm × 4000 mm area was inspected in less than a minute
- Full coverage at the desired resolution (dictated by the minimum acceptable defect size)
- Increased probability of detection via intuitive images
- Data in a digital format
- Fast reporting
OmniScan and HydroFORM are registered trademarks and OmniPC and MapROVER are trademarks of Olympus Corporation.
Inconel is a registered trademark of Special Metals Corporation.
Get In Touch
.jpg?rev=CB3C)
