Cleanliness analysis is paramount in the aerospace industry, where small contaminants—often invisible to the naked eye—can shorten a system’s lifespan, cause it to malfunction, and even lead to its failure. This is particularly important for contamination-critical systems such as turbines, fuel lines, and fuel tanks. To address these risks, the microscopic detection of particulate contamination on manufactured aerospace components has become a fundamental aspect of quality control.
Here we dive into the standards and processes of cleanliness analysis in the aerospace industry, highlighting solutions that can ease the inspection workflow while increasing confidence in the cleanliness data.
Technical Cleanliness Standards for Aerospace
The awareness of potential product performance and safety risks has led to the development of stringent technical cleanliness standards, both company-specific and international. These standards require detailed information about the nature and quantity of particulate contamination of manufactured components.
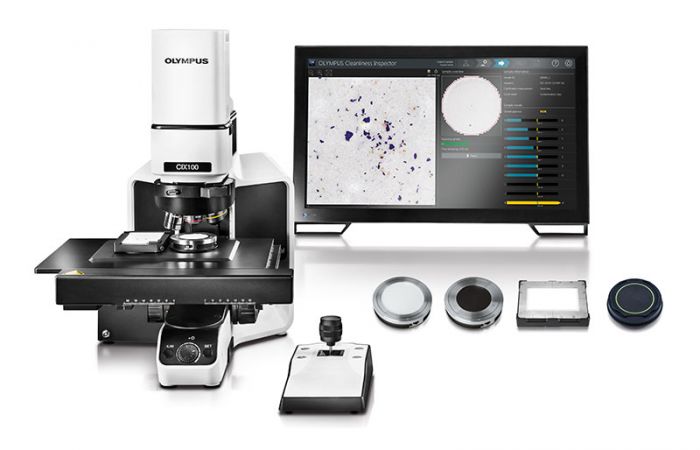
To achieve this, many aerospace component manufacturers have turned to microscope systems specifically designed for assessing technical cleanliness. These systems support the cleanliness monitoring of production environments, helping to minimize production downtime, as well as material and energy waste.

Example of a microscope-based technical cleanliness system.
How Cleanliness Is Assessed for Aerospace Components
The process of cleanliness analysis typically starts with a random selection of parts from the production line. These parts undergo a sampling, which involves an extraction process to remove the particles from the surface of the part for analysis.
In short, the extraction process involves the following steps:
- Parts are washed so that particles are captured in a rinse fluid
- Particles are filtered out and collected on a membrane
- After drying, the membrane is weighed to indicate the level of contamination on the washed parts
It is important to note that weighing the membrane offers limited information. To understand the specifics of the particulate contamination, such as the type and size of the particles, an analysis is conducted using a light microscope.
The findings from this analysis are crucial, as they classify particles according to international standards. Detailed reports on the nature of these particles are compiled, including their shapes, size distribution, and contamination levels for each class of particles.
Collecting Information on Metallic Particles and Other Particle Types
Information on the nature of the particles is also critical to distinguish between fibers and non-fibers, as well as between metallic and nonmetallic particles. Identifying metallic particles is crucial in many cleanliness applications for the following reasons:
- Metallic particles are harder than nonmetallic particles and potentially more harmful to the components being tested
- Metallic particles can have drastic effects on mechanical and electrical properties
For instance, metal particles in an internal combustion engine don’t burn. Over time, they can reduce the life of the components. Metal particles also pose a risk in the production of lithium-ion batteries due to the high electrical conductivity of metallic materials. Notably, metal impurities introduced in the production process can cause a short circuit and lead to battery failure.
If the results of the microscopic analysis indicate that the number of particles in any of these classes exceeds the assigned limit, the tested part will fail the cleanliness analysis.
Other Sampling Techniques for Aerospace Component Cleanliness
For components where washing off the particles is undesirable or impossible, inspectors in the aerospace industry may use alternative sampling methods.
1. Tape lift sampling of aerospace components
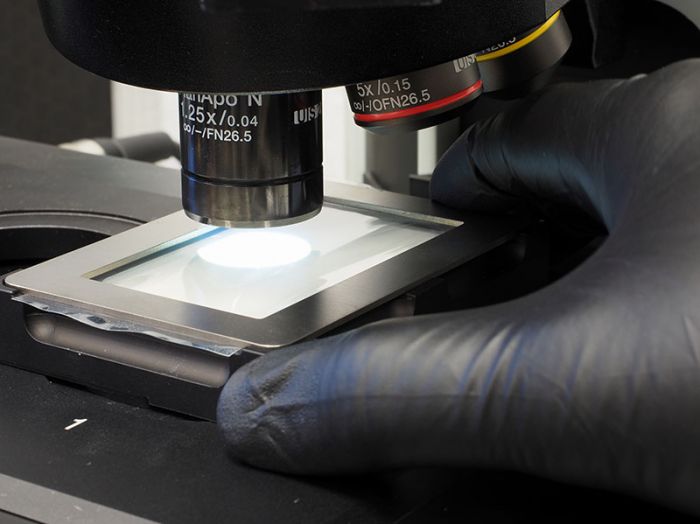
One example is the tape lift technique. Detailed in the ASTM E1216-11 standard, the tape lift method involves applying a pressure-sensitive tape to the part's surface to collect contaminants. These extracted particles are analyzed under a microscope to obtain detailed information on the level of contamination. The tape (with the attached particles) is mounted on a special holder, where the particles are counted using the microscope.

An operator prepares a tape lift sample for cleanliness analysis under a microscope.
The number of particles found in the examined area is then extrapolated to an area of 1000 cm² to obtain comparable values. As a result, the number of particles found can also be calculated as a degree of cleanliness or as a surface cleanliness index (SCI).
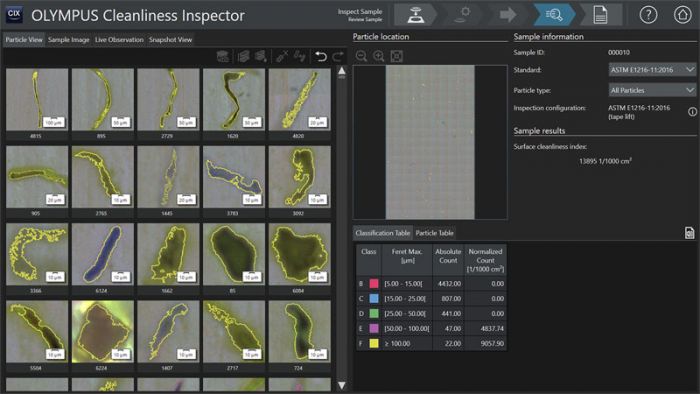
With the SCI, the particle measurement results are weighted based on the particle sizes, as the damage potential of larger particles is much greater than that of smaller particles. The number of particles in each size class is multiplied by this weighting factor to get the SCI per size class. Then the SCIs for each class are added together to obtain the SCI for the full inspection (as shown in the screenshot below).

Cleanliness analysis results for a tape lift sample captured on the microscope system showing the surface cleanliness index.
2. Sampling of contamination-critical aerospace parts
In another example, the IEST-STD-CC1246E standard defines methods for specifying and determining the degree of surface cleanliness for contamination-critical aerospace components. This standard also refers to a component surface of 1000 cm².
For the test, the standard describes that the particles are first washed off the object surface and filtered onto a membrane. Deviating from this, it is possible to identify the particles removed from the surface using the tape lift method based on the classification of the IEST-STD-CC1246E standard.
A combination of the various extraction methods and the presentation of the results of the particle analysis is possible. In this way, the inspection of technical cleanliness can be adapted to the quality specifications and technical conditions.
Automation in Cleanliness Inspections of Aerospace Parts
The adoption of turnkey, automated solutions is simplifying cleanliness inspections for aerospace components while increasing confidence in the data. For example, our CIX100 inspection system is designed to streamline the entire process from mounting the sample to generating a professional, compliant report.

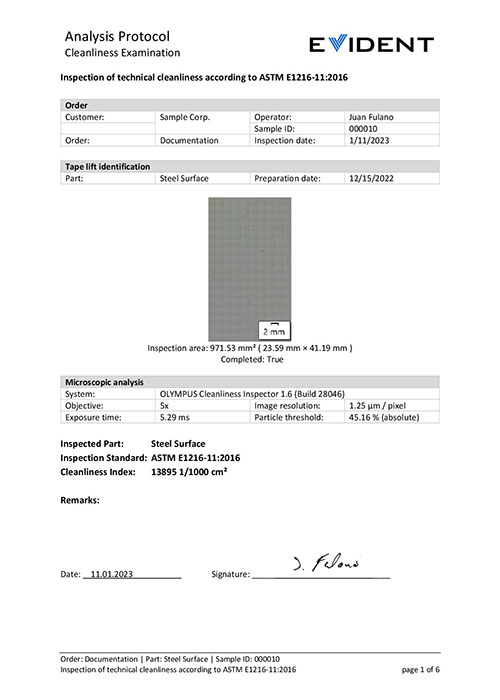
Example report showing the surface cleanliness index for a tape lift sample according to the ASTM E1216-11 standard.
Once the user mounts the sample, the CIX100 system uses guided workflows and automation to speed up the inspection. These features help provide operator-independent measurements while reducing the likelihood of sample contamination. In one scan, the system can detect contaminants as small as 2.5 µm and differentiate between metallic particles, nonmetallic particles, and fibers.
The software also optimizes the inspection area and image settings based on the sample type, whether it’s a filter membrane, tape lift sample, or particle trap. The software produces the results and reporting for the selected standard, making the system highly flexible for different inspection goals across industries. A professional report is generated in one click.
In industries where data integrity and traceability are essential, features such as user rights management are critical. These features in the CIX100 system restrict certain users from accessing key parameters such as:
- Calibration
- Modification of the inspection configuration and standards
- Customization of the report template
These restrictions provide a simpler workflow, so even novice operators can conduct reliable and repeatable cleanliness inspections for applicable standards. To see how this streamlined process works from sampling to reporting, reach out to our team for a demonstration today.
Related Content
An Overview of the Washing Method in Component Cleanliness Inspections


