Introduction to Eddy Current Testing
Magnetism, the underlying principle behind electric motors and generators, relays, and stereo speakers, is also the force that enables an important category of NDT tools called eddy current testing instruments. Eddy current (EC) testing is a no-contact method for the inspection of metallic parts.
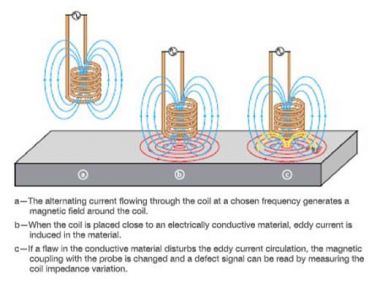
Eddy currents are fields of alternating magnetic current that are created when an alternating electric current is passed through one or more coils in a probe assembly. When the probe is placed close to the part under inspection, the alternating magnetic field induces eddy currents in the test part. Discontinuities or property variations in the test part change the flow of the eddy current and are detected by the inspection probe, enabling material thickness measurements or the detection of defects such as cracks and corrosion.
Over the years, probe technology and data processing have advanced to the point where eddy current testing is recognized as being fast, simple, and accurate. The technology is now widely used in the aerospace, automotive, petrochemical, and power generation industries for the detection of surface or near-surface defects in materials such as aluminum, stainless steel, copper, titanium, brass, Inconel® alloys, and even carbon steel (surface defects only). In this article, we cover what eddy current testing is, how it works, and common testing applications and methods. You can find more specific details on eddy current testing within our tutorial.
How Eddy Current Testing Works

Eddy current testing is based on the physical phenomenon of electromagnetic induction. In an eddy current probe, an alternating current flows through a wire coil and generates an oscillating magnetic field. If the probe and its magnetic field are brought close to a conductive material, such as a metal test piece, a circular flow of electrons known as an eddy current begin to move through the metal like swirling water in a stream. That eddy current flowing through the metal in turn generates its own magnetic field, which interacts with the coil and its field through mutual inductance.
Changes in metal thickness or defects, such as near-surface cracking, interrupt or alter the amplitude and pattern of the eddy current and the resulting magnetic field. This in turn affects the movement of electrons in the coil by varying the electrical impedance of the coil. The eddy current instrument plots changes in the impedance amplitude and phase angle, which can be used by a trained operator to identify changes in the test piece.
Eddy current density is highest near the surface of the part, so that is the region of highest test resolution. The standard depth of penetration is defined as the depth at which the eddy current density is 37% of its surface value, which in turn can be calculated from the test frequency and the magnetic permeability and conductivity of the test material. Thus, variations in the conductivity of the test material, its magnetic permeability, the frequency of the AC pulses driving the coil, and coil geometry all have an effect on test sensitivity, resolution, and penetration.
There are many factors that can affect the capabilities of an eddy current inspection. Eddy currents traveling in materials with higher conductivity values are more sensitive to surface defects but have less penetration into the material, with penetration also being dependent on test frequency. Higher test frequencies increase the near-surface resolution but limit the depth of penetration, while lower test frequencies increase penetration. Larger coils inspect a greater volume of material from any given position, since the magnetic field flows deeper into the test piece, while smaller coils are more sensitive to small defects. Variations in permeability of a material generate noise that can limit flaw resolution because of greater background variations.
While conductivity and permeability are properties of the test material that are outside of the operator's control, the test frequency, coil type, and coil size can be chosen based on test requirements. In a given test, resolution is determined by the probe type while detection capability is controlled by material and equipment characteristics. Some inspections involve sweeping through multiple frequencies to optimize results or inspection with multiple probes to obtain the best resolution and penetration required to detect all possible flaws. It is always important to select the right probe for each application to optimize the test performance.
Eddy Current Testing Equipment
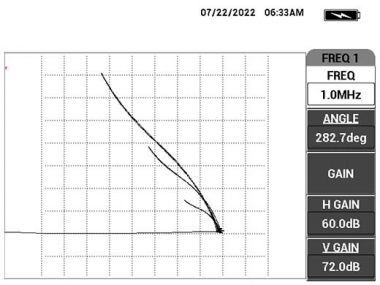
While some older eddy current instruments used simple analog meter displays, the standard format now is an impedance plane plot that graphs coil resistance on the x-axis versus inductive reactance on the y-axis. Variations in the plot correspond to variations in the test piece. For example, the display below shows a setup for inspection for surface cracks in aluminum. The top curve represents a 0.04 in. deep surface crack, the middle curve is a 0.02 in. deep crack, and the smallest curve is a 0.008 in. deep crack. The horizontal line is the liftoff in which the probe has been “nulledˮ (balanced) on the aluminum part and when it is lifted in the air, the signal moves directly to the left. This inspection is done with a pencil probe.

This display would be considered the calibration of the instrument. Once the parameters are set, they should not be changed during the inspection. The inspection measurements are dependent entirely on the comparison of the signal against the reference calibration.
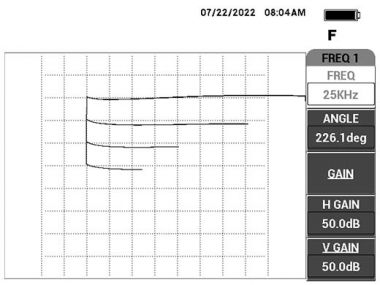
Another common test involves the measurement of nonconductive coatings such as paint applied on metals. The screen display below shows a nonmetallic coating on aluminum. For this application, the probe is “nulledˮ (balanced) in the air and then placed on the sample. The top line shows the signal on aluminum without any coating. The second line down is a 0.004 in. coating, then a 0.008 in. coating, and the bottom line is a 0.012 in. coating. To create this image, the display position had to be changed between each measurement in order to display a separation between each signal. After this calibration is done, the inspector measures the material and watches for the distance that the signal travels across the screen. Alarms could be used to alert the inspector when a coating is too thick or too thin.

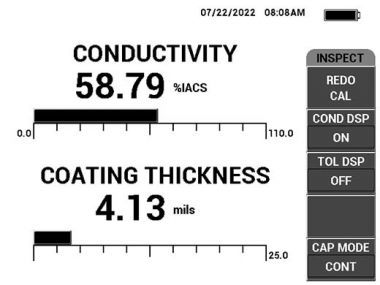
A second way to measure the thickness of a nonconductive coating on a conductive material is using the conductivity measurement capability of Olympus NORTEC™ 600 series instruments (N600C, N600S, and N600D models). This measurement uses a special conductivity probe that displays the below screen instead of the standard impedance screen shown above. This measurement is most commonly used to determine the conductivity of a material, but it also provides the thickness of a coating, which is considered the “Liftoffˮ from the material, or how far the probe is above the surface of the conductive material. This example was a 0.004 in. coating on an aluminum test piece.

Eddy current testing instruments can perform a wide variety of tests, depending on the type of probe being used. Careful probe selection helps optimize the testing performance.
Common Types of Eddy Current Probes
Some probes that are commonly used for ECT are listed below with a description of the flaw types they target and parts they are usually used to inspect.
Surface probes: Used for identifying flaws on and below metal surfaces, surface probes usually have a large diameter to accommodate lower frequencies for deeper penetration or for scanning larger areas.
Pencil probes: Smaller diameter probes housing coils built for high frequencies for high resolution of near-surface flaws.
Bolt hole probes: Designed to inspect the inside of a bolt hole, these probes can be rotated by hand or automatically using a rotary scanner.
Donut probes: Designed to inspect aircraft fastener holes with the fasteners in place.
Sliding probes: Also used in testing aircraft fastener holes, sliding probes offer higher scan rates than donut probes.
ID probes: Used for the inspection of heat exchangers and similar metal tubing from the inside, internal diameter (ID) probes are available in a variety of sizes.
OD probes: Used for inspection of metal tubing and bars from the outside, with the test piece passing through the coil.
You can find a full list of eddy current probe types and how they are used here.
Common Applications
Eddy current testing is widely used in the aerospace industry and in other manufacturing and service environments that require inspection of thin metal for potential safety-related or quality-related problems. In addition to crack detection in metal sheets and tubing, eddy current testing can be used for certain metal thickness measurements such as identifying corrosion under aircraft skin, measuring conductivity and monitoring the effects of heat treatment, and determining the thickness of nonconductive coatings over conductive substrates. Both field portable and fixed system instruments are available to meet a wide variety of test needs.
Eddy current NDT can examine large areas very quickly, and it does not require the use of coupling liquids. In addition to finding cracks, eddy current testing can also be used to check metal hardness and conductivity in applications where those properties are of interest, and to measure thin layers of nonconductive coatings, such as paint on metal parts. At the same time, eddy current testing is limited to materials that conduct electricity and thus cannot be used on plastics. In some cases, eddy current and ultrasonic testing are used together as complementary techniques, with eddy current having an advantage for quick surface testing and ultrasonics having better depth penetration.
We have included a list of some of the most common eddy current testing applications below:
Weld inspection—Many weld inspections use ultrasonic NDT for subsurface testing and a complementary eddy current method to scan the surface for open surface cracks on weld caps and in heat-affected zones (HAZ).
Conductivity testing—Eddy current testing’s ability to measure conductivity can be used to identify and sort ferrous and nonferrous alloys and to verify heat treatment.
Surface inspection—Surface cracks in machined parts and metal stock can be readily identified with eddy current. This includes inspection of the area around fasteners in aircraft and other critical applications.
Corrosion detection—Eddy current instruments can be used to detect and quantify corrosion on the inside of thin metal such as aluminum aircraft skin. Low-frequency probes can be used to locate corrosion on second and third layers of metal that cannot be inspected ultrasonically.
Bolt hole inspection—Cracking inside bolt holes can be detected using bolt hole probes, often with automated rotary scanners.
Tubing inspection—Both in-line inspection of tubing at the manufacturing stage and field inspection of tubing such as heat exchangers are common eddy current applications. Both cracking and thickness variations can be detected.
You can find a extensive list of eddy current testing applications here.
Reference Standards for Eddy Current Testing
An eddy current system consisting of an instrument and a probe must always be calibrated with appropriate reference standards at the start of a test. This process involves identifying the baseline display from a given test piece and observing how it changes under the conditions that the test is intended to identify. In flaw detection applications, this calibration process typically involves the use of reference standards of the same material, shape, and size as the test piece, containing artificial defects such as saw cuts, drilled holes, or milled walls to simulate flaws. In thickness measurement applications, the reference standards would consist of various samples of known thicknesses. The operator observes the response from the reference standards and then compares the indications from test pieces to these reference patterns to categorize parts. Proper calibration with appropriate reference standards is an essential part of any eddy current test procedure.
Eddy Current Arrays
Eddy current array testing, or ECA, is a technology that provides the ability to simultaneously use multiple eddy current coils that are placed side by side in the same probe assembly. Each individual coil produces a signal relative to the phase and amplitude of the structure below it. This data is referenced to an encoded position and time and represented graphically as a C-scan image showing structures in a planar view. In addition to providing visualization through C-scan imaging, ECA enables coverage of larger areas in a single pass while maintaining high resolution. ECA can permit use of simpler fixturing and can also simplify the inspection of complex shapes through custom probes built to fit the profile of the test piece.