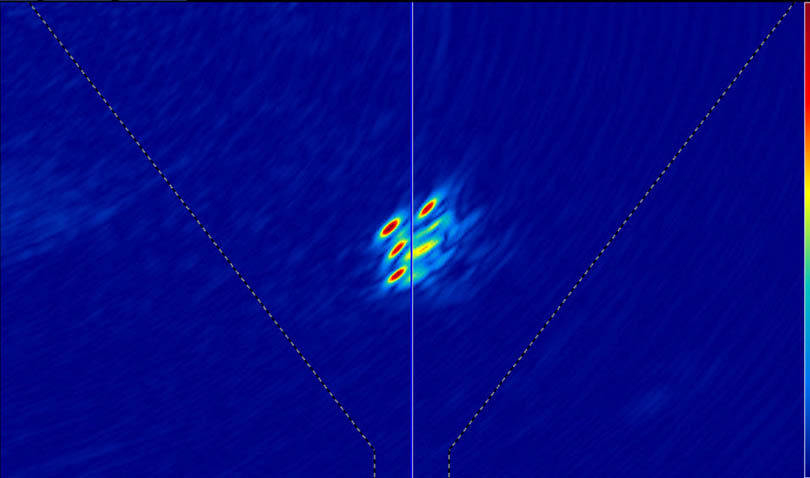
When the full matrix capture/total focusing method (FMC/TFM) was introduced to the NDT industry a few years ago, it was perceived as a revolutionary technique that would optimize inspection time and results. However, over time, some limitations and challenges came to light, especially for weld inspection applications.
From selecting the probe to performing the calibration, the inspector has critical choices to make to build an optimized inspection strategy that complies with the governing code.
At the time of writing, the only NDT industry code containing regulations that apply to FMC or TFM is the ASME Boiler and Pressure Vessel Code (BPVC). Its Section V, Article 4 (2019) includes the following appendixes:
- Mandatory Appendix XI Full Matrix Capture (FMC)
- Nonmandatory Appendix F Examination of Welds Using Full Matrix Capture (FMC)
- Specific personnel requirements and a training outline in Sec. V, Article 1
Here are the 4 essentials for building a TFM strategy for weld inspection that complies with this code:
1. Selecting the Right Probe
With standard phased array ultrasonic testing (PAUT), the probe choice is crucial to the success of your inspection. Since TFM obeys the same principles of physics as PAUT, which probe you choose is equally important. The performance of a given probe depends on the combination of the following characteristics:
- Number of elements
- Pitch/width of elements
- Frequency/wavelength
Inspectors need to find the best combination of these characteristics to suit the type of application, the characteristics of the part to inspect, and the targeted region of interest in the part. For example, a large aperture (element pitch times the number of elements) combined with a high frequency tends to result in better focalization at a deeper position in the part, while a smaller aperture combined with a lower frequency tends to produce better focalization in the near-surface area.
With TFM inspection, there are several wave sets (sets of beams grouped according to their propagation modes), so it is impossible to visualize the impact of these parameters on each one without a proper modeling tool. The Acoustic Influence Map (AIM) tool in the OmniScan™ X3 flaw detector enables you to compare the sensitivity coverage in the region of interest between different probes, taking into consideration the material velocity and the flaw type and orientation.
The images below show an example of how you can use the AIM tool to guide your probe selection for FMC/TFM inspection. The AIM sensitivity coverage is shown for four different probe models. The wave set (2T), input material velocity, and flaw type (spherical) are the same for all four maps.
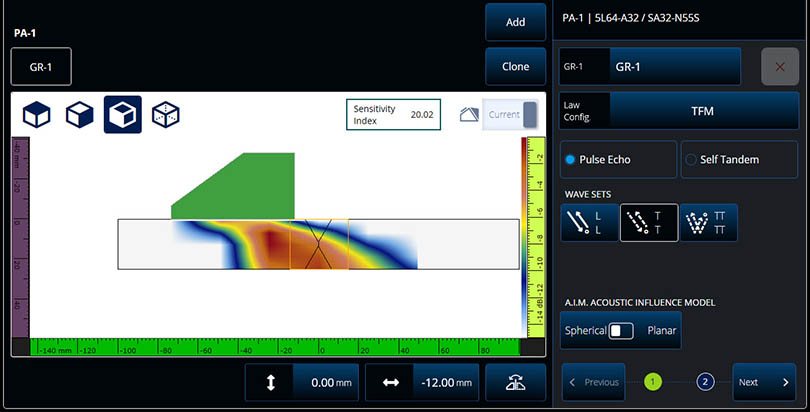
Probe model: 5L64-A32. Number of elements: 64. Frequency: 5 MHz. Pitch: 0.5 mm.
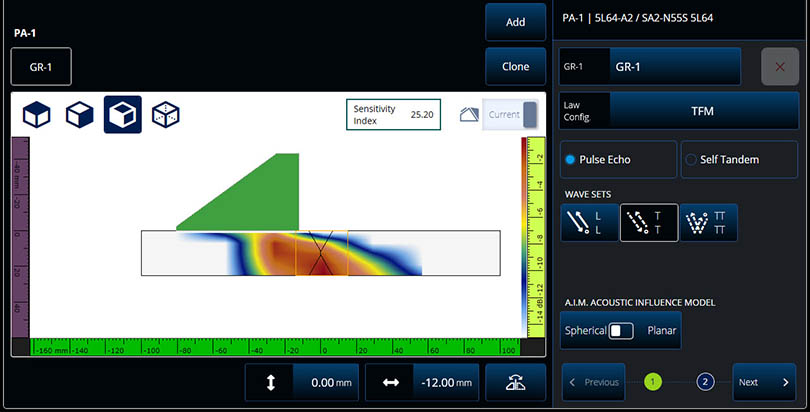
Probe model: 5L64-A2. Number of elements: 64. Frequency: 5 MHz. Pitch: 0.6 mm.
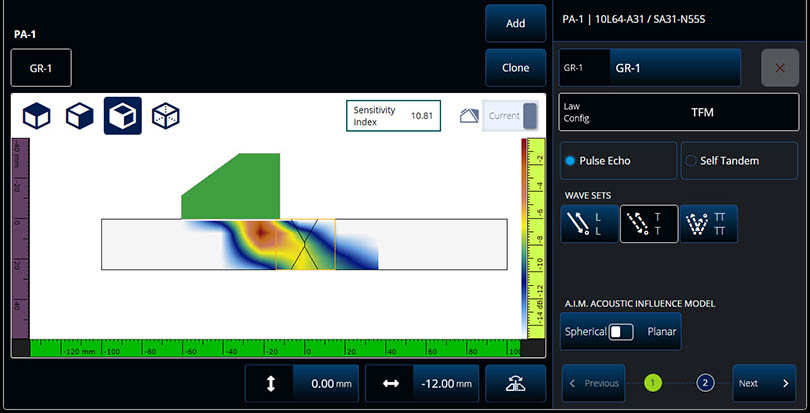
Probe model: 10L64 A31. Number of elements: 64. Frequency: 10 MHz. Pitch: 0.31 mm.
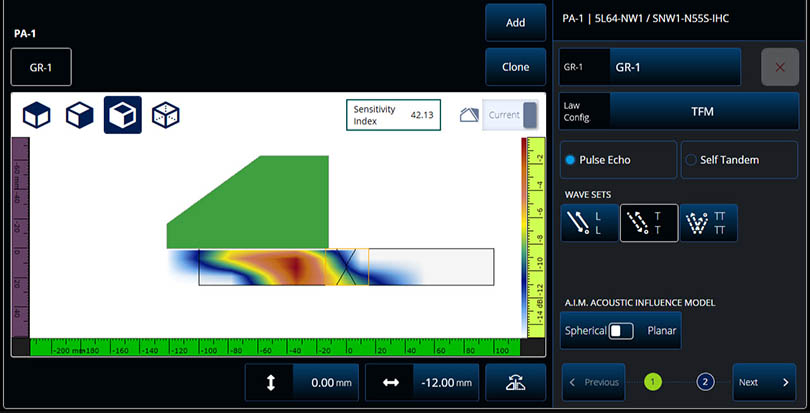
Probe model: 5L64 NW1. Number of elements: 64. Frequency: 5 MHz. Pitch: 1 mm.
It’s important to know how to correctly interpret the level of sensitivity that the colors represent since they are relative to the maximum expected amplitude of each map. That is why the “Sensitivity Index” reading is given. Check out this application note for a simple explanation of AIM and the Sensitivity Index.
Comparison of these four AIM models tells us that the pitch and frequency have an important impact on the resulting sensitivity map. In this example, of the four probes, only two offer adequate coverage in the region of interest (ROI) in TT mode—the 5L64-A32 and 5L64-A2 probes. The better choice in this case is the second model because of its higher Sensitivity Index reading (25.20 vs 20.02), which indicates a higher decibel level for the red color waves covering the ROI.
2. Optimizing Your Scan Plan Using a Modeling Tool
An optimized scan plan is key to a successful inspection strategy. The ASME code requires that your FMC/TFM scan plan depict, at minimum, the examination volume coverage and the weld joint geometry, and it must include the wave sets that are used, the grid density information, and the scan pattern (index and scan offsets, zero datum point, and the number of needed scan lines).
Selection of the optimal wave set while considering the probe focusing capabilities, the part geometry, and the expected flaw type and orientation is one of the biggest challenges that an inspector faces while setting up a TFM inspection.
The OmniScan X3 instrument’s AIM tool takes into account all these parameters in its estimation of the sensitivity coverage, facilitating the selection of the proper wave set and the index offset.
The four screen shots below show the AIM sensitivity maps for two pulse-echo propagation mode wave sets (2T and 4T) and two self-tandem propagation mode wave sets (3T and 5T).
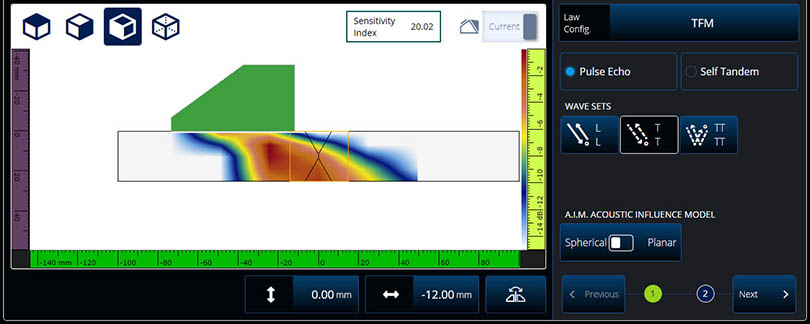
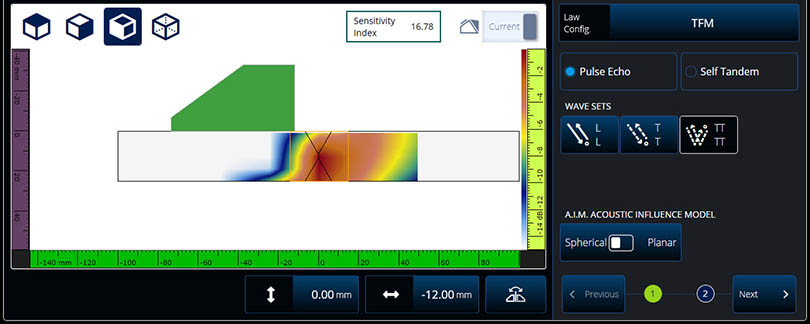
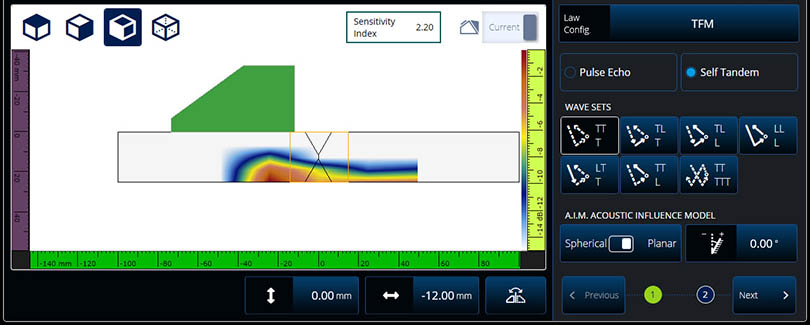
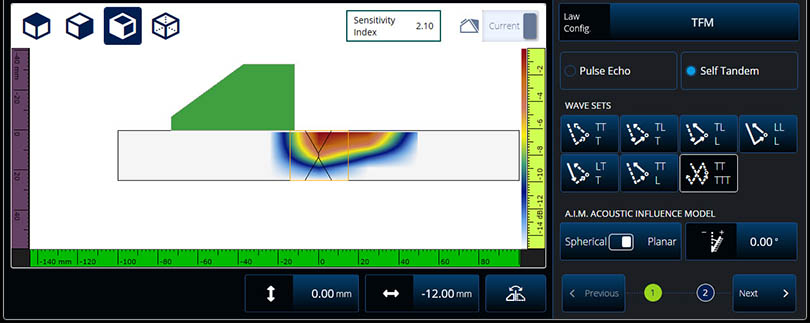
For the P/E modes (2T and 4T) the flaw type is set to spherical while for the self-tandem modes (3T and 5T) the flaw type is set to planar at 0°. These (4) modes represent a good combination for a multigroup setup. The probe for all four is the 5L64 A32 model mounted on an SA32-N55S wedge, placed at a −12 mm offset from a double V weld centerline of a 25 mm carbon steel plate.
3. Software with Powerful Amplitude Fidelity and Envelope Algorithms
Amplitude fidelity (AF) is the measurement (in dB) of the maximum amplitude variation of an indication caused by the TFM grid resolution. AF depends mainly on probe frequency and bandwidth, material velocity, grid resolution, and the applied envelope.
To be code compliant, the AF must not exceed 2 dB. If it goes over the tolerance, the inspector can either increase the resolution, reduce the zone size, or increase the probe frequency until the requirement is met.
The OmniScan X3 instrument displays the AF value that corresponds to the highest measurement in all the grid axes—the horizontal, vertical, and propagation axes—not only in the horizontal axis. For weld applications, the propagation axis is the most valuable.
It’s important to note that theoretical (calculated) and practical AF verifications are both code compliant.
The TFM envelope is obtained by computing the norm of two different TFM images, one using the standard acquired FMC data and a second computed using the Hilbert transformed FMC. The envelope removes the signal oscillations in the image, improving the robustness of maximum amplitude measurements, thereby improving the sizing accuracy. No information is lost, only the signal is processed.
Activating the TFM envelope provides:
- Easier sizing for amplitude-based sizing methods (e.g., the 6 dB drop method)
- Better amplitude fidelity for the same grid resolution
- A higher acquisition rate for the same AF
To learn more about the about the TFM envelope feature, I recommend reading “Use of the Total Focusing Method with the Envelope Feature.”
4. Multigroup Configuration Capability
A code-compliant setup requires multigroup configuration for two reasons:
- The code states that direct paths like 2T or 2L are not adequate for full volume coverage.
- In the calibration process, path verification requires the detection of the full extent of a through-wall slot. The imaging paths used during calibration shall be the same as those for the examination.
Inspectors with PAUT experience have tried to reproduce results comparable to a standard sectorial scan by using only one group with a 2T wave set and doubling the part thickness in the machine’s settings. I don’t recommend this practice, however, because this configuration with only one wave set cannot detect the full extent of the through-wall slot of the calibration block, which is necessary to pass the path verification requirement.
To achieve the code requirements, a multigroup configuration including self-tandem wave sets, such as 3T and 5T, is necessary. Using the OmniScan X3 flaw detector, it is possible to configure and run up to four groups without affecting the AF and resolution quality.
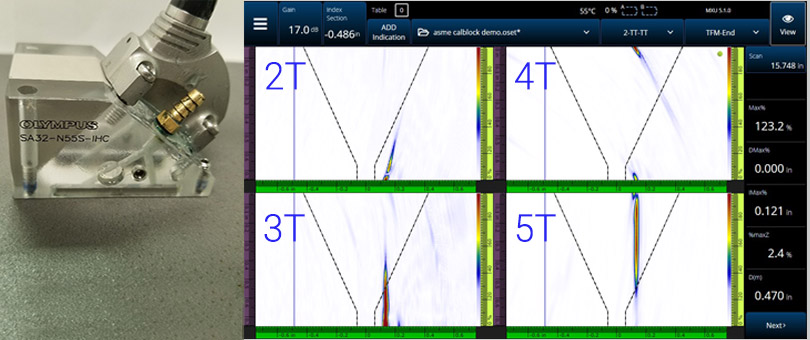
Here we see photo (above) of a setup using a 5L64-A32 probe placed on the calibration block facing the through-wall slot. The images on the right are screen shots of the resulting end views of the multigroup setup. They clearly demonstrate that the full extent of the slot is detected by the 3T and 5T self-tandem modes. The image and data are courtesy of K. Shane Walton (University of Ultrasonics).
Tips for optimal calibration:
- Like in standard PAUT, TFM inspection of thick components may require multiple scans using different index offsets to help ensure full coverage of the weld volume. In such cases, the path verification should be performed using the same index offsets (used for final scanning), and it should demonstrate that the full extent of the through-wall slot is detected.
- Cal block thickness: Optimal results are obtained when the cal block’s thickness is no more than ± 5% of the inspected part’s thickness.
Interested in learning more about TFM inspection and code-compliance myths and facts? Watch the “Ensuring Code Compliance While Using the Total Focusing Method” webinar, now available on demand.
Related Content
White Paper: TFM Acoustic Influence Map
Video: FMC-TFM Basic Principles
Total Focusing Method Webinar Series
Get In Touch
