LEXT OLS4100
Improving Measurement Precision
Suppression of aberration through specialized objectives
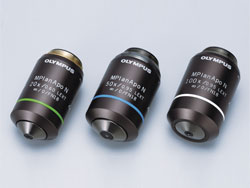 LEXT-Dedicated Objectives | The theoretical ideal lens takes light from a single point through the lens and brings it together at a single focal point. In practice there is a discrepancy (aberration) between the ideal and the actual, and that leads to error in roughness measurement. The LEXT OLS4000 improves aberration performance with a specialized LEXT objective, which has a design optimized for the 405nm laser wavelength. It can measure the detailed form of a sample across the entire field of view. |
Improved slope surface detection capability
| With a conventional laser microscope, it is difficult to image a sample with differing light reflection rates, so it was not possible to detect height data for steeply sloping surfaces with little light reflection. The OLS4000 is equipped with a specialized objective of high NA and a 405nm laser, so it can reliably take measurements even from steeply angled samples that could not previously be measured. | |
Conventional laser microscope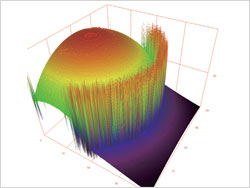 | LEXT OLS4000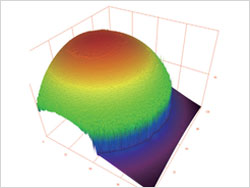 |
| Sample: Ruby sphere, field of view: 126×126um
Image acquisition from a ruby sphere of φ153μm. Imaging clearly succeeded until close to a vertical surface. | |
Reduction of incorrect values
In optical instruments, peak noises, that are not detected by contact-type instruments, can be included in the measurements. This is a phenomenon specific to optical instruments including laser microscopes and it can become a factor in measurement errors. The OLS4000 is equipped with specialized objectives and applies measures to reduce the signal to noise ration in the system as a whole (improvement of stability in laser oscillation, improvement of detection system amp properties, etc.), succeeding in eliminating incorrect values and obtaining stable measurement results that do not depend on the form of the sample. The results show a high level of consistency with contact-type measurement results.
Guaranteed "Accuracy"
Reconciling repeatability with accuracy
There are two indices for expressing measurement precision: repeatability and accuracy. Repeatability means how small the inconsistency is between repeated instances of a measurement value, while accuracy indicates how close the measurement value is to the true value. The LEXT OLS4000 is the laser microscope to guarantee both repeatability and accuracy.
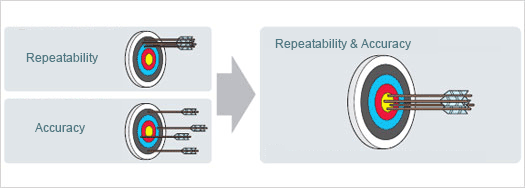
World-standard traceability
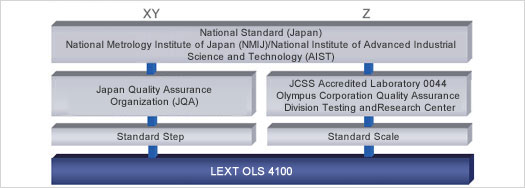
The instrument used must be accurate if highly reliable measurement results are to be obtained. If the instrument itself lacks reliability, measurement results will lose reliability and the quality and performance of the finished product cannot be guaranteed. The OLS4000 is traceable to the the National Institute of Advanced Industrial Science and Technology (AIST), and the Japan Quality Assurance Organization (JQA).. A highly reliable instrument, the OLS4000 provides accurate measurement
results that you can count on.
Capable of two measurement methods
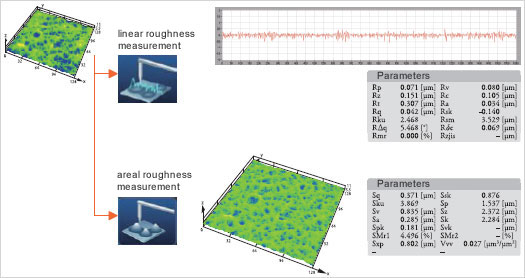
The LEXT OLS4000 has two measurement methods: "linear roughness measurement" and "areal roughness measurement." It uses the characteristics of a laser microscope to measure the sample without contact, and without losing any observation performance, analyzing linear roughness and areal roughness. Compared to a contact-type instrument, it is easier to align the position, and it is easy to measure the roughness of a very small target area. The time required for measurement is
short, so it is also suitable for areal roughness measurement.
Equivalence with a contact-type surface roughness instrument
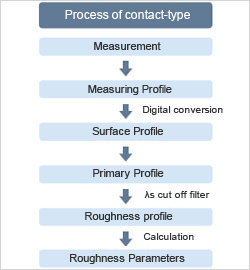 | The measurement standard for contact-type surface roughness instrument (ISO11562:1996/JIS B0632:2001) regulates detection of the wavelength composition (the cycle of roughness unique to the sample) through a phase compensation filter, and the performance of various analyses. For example, when finding roughness parameters, the OLS4000, a non-contact instrument, excludes the short wavelength portion that passes through the low-range phase compensation filter λs, and the long-wavelength portion that passes through the high-range phase compensation filter λc, and then uses the data obtained (the roughness curve) to calculate parameters. This maintains data equivalence with contact-type instruments and ensures the equivalence of measurement results. The OLS4000 can obtain the equivalent results through the same kind of filter processing as a contact-type instrument. Even when compared to an instrument that uses different measurement principles, correlation of measurement results is confirmed. |
Equipped parameters
Parameter compatibility
The LEXT OLS4000 is equipped with the same roughness parameters (two-dimensional) as a contact-type instrument. It can deliver the same kind of operability as a contact-type instrument, and obtain compatible measurement results.
| Primary Profile | Pp, Pv, Pz, Pc, Pt, Pa, Pq, Psk, Pku, PSm, PΔq, Pmr(c), Pδc, Pmr |
| Roughness Profile | Rp, Rv, Rz, Rc, Rt, Ra, Rq, Rsk, Rku, RSm, RΔq, Rmr(c), Rδc, Rmr, RzJIS |
| Waviness Profile | Wp, Wv, Wz, Wc, Wt, Wa, Wq, Wsk, Wku, WSm, WΔq, Wmr(c), Wδc, Wmr |
| Bearing Area Curve | Rk, Rpk, Rvk, Mr1, Mr2 |
| Motif | R, Rx, AR, W, Wx, AW |
| Roughness Profile (JIS 1994) | Ra(JIS1994), Ry, Rz(JIS1994), Sm, S, tp |
Compatibility with next-generation parameters
The OLS4000 is equipped with roughness parameters (three-dimensional) in compliance with ISO25178. Analysis of higher reliability can be used in the assessment of areas.
| Amplitude Parameters | Sp, Sv, Sz, Sa, Sq, Ssk, Sku |
| Functional Parameters | Smr(c), Sdc(mr), Sk, Spk, Svk, SMr1, SMr2, Sxp |
| Volumetric Parameters | Vv(p), Vvv, Vvc, Vm(p), Vmp, Vmc |
| Lateral Parameters | Sal, Str |
Parameter expression definitions
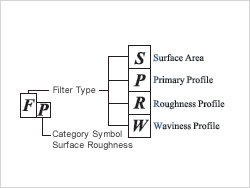
|
> Click here for detail about OLS4100, laser confocal microscopes
> Click here for detail about OLS4500, nano search microscopes
