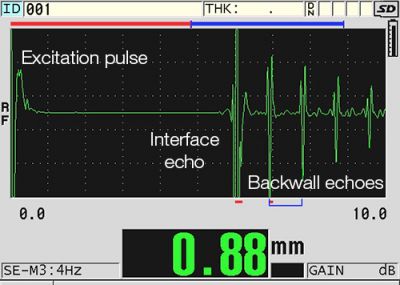
Teoria e aplicação dos medidores de espessura de precisão por ultrassom
by Kenneth A. Fowler, Gerry M. Elfbaum, and Thomas J. Nelligan
Ultrasonic nondestructive testing (NDT) – a method of characterizing material thickness, integrity, or other physical properties by means of high frequency sound waves -- is a widely used technique for product testing and quality control. In thickness gaging applications, ultrasonic techniques permit quick and reliable measurement of thickness without requiring access to both sides of a part. Calibrated accuracies as high as ±2 micrometers or ±0.0001 inch are achievable in some applications. Most engineering materials can be measured ultrasonically, including metals, plastic, ceramics, composites, epoxies, and glass, as well as liquid levels and the thickness of certain biological specimens. Online or in-process measurement of extruded plastics or rolled metal is often possible, as is measurement of individual layers or coatings over substrates in multilayer materials. Modern hand-held digital gages are simple to use and highly reliable.
Commercial ultrasonic thickness gages are generally divided into two types: corrosion gages and precision gages. Corrosion gages are specifically designed for measuring the remaining wall thickness of metal pipes, tanks, structural parts, and pressure vessels that are subject to internal corrosion that cannot be seen from the outside. They employ signal processing techniques that are optimized for detecting the minimum remaining thickness in a rough, corroded test piece, and they use specialized dual element transducers for this purpose. Corrosion gages are outside the scope of this paper. The precision gages discussed here use single element transducers and are recommended for all other applications (including smooth metal). With many different types of transducers available, precision gages are extremely versatile and can measure to higher accuracy than corrosion gages.
1. Measurement Principles
Precision ultrasonic thickness gages usually operate at frequencies between 500 KHz and 20 MHz, using broadband, well damped piezoelectric transducers that when excited by electrical pulses generate bursts of sound waves, and in receiving mode convert sound waves back into electrical pulses. A wide variety of transducers with various acoustic characteristics have been developed to meet the needs of diverse industrial applications. Typically, lower frequencies will be used to optimize penetration when measuring thick, highly attenuating, or highly scattering materials, while higher frequencies will be recommended to optimize resolution in thinner, non-attenuating, non-scattering materials. A broadband design is typically used for precision thickness gaging applications to that maximize near surface resolution.
A pulse-echo ultrasonic thickness gage determines the thickness of a part or structure by accurately measuring the time required for the short ultrasonic pulse generated by a transducer to travel through the thickness of the material, reflect from the back or inside surface, and return to the transducer. In most applications this time interval is only a few microseconds or less. The measured round trip transit time is divided by two to account for the down-and-back travel path, and then multiplied by the velocity of sound in the test material. The result is expressed in the well-known relationship:
d = Vt/2
where d = the thickness of the test piece
V = the velocity of sound waves in the material
t = the measured round-trip transit time
Additionally, in actual practice, a zero offset is usually subtracted from the measured time interval to account for certain fixed electronic and mechanical delays. In the common case of measurements involving direct contact transducers, the zero offset compensates for the transit time of the sound pulse through the transducer's wearplate and the couplant layer, as well as any electronic switching time or cable delays. This zero offset is set as part of instrument calibration procedures and is necessary for highest accuracy and linearity.
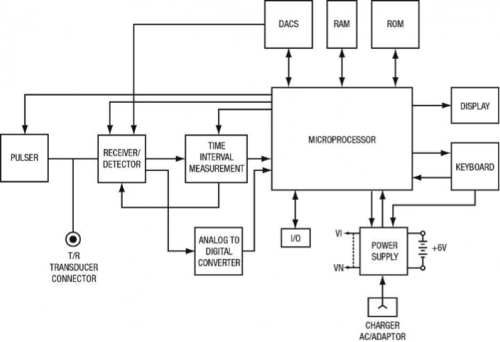
Figure 1 represents a block diagram of a typical ultrasonic thickness gage. The pulser, under the control of the microprocessor, provides a broadband spike or tuned square wave voltage impulse to the transducer, generating the outgoing ultrasonic wave. Echoes returned from the test piece are received by the transducer and converted back into electrical signals, which in turn are fed into the receiver amplifier and then digitized. The microprocessor-based control and timing logic both synchronizes the pulser and selects the appropriate echoes that will be used for the time interval measurement. Automatic gain control is commonly utilized to normalize echo amplitude.
If echoes are detected, the timing circuit will precisely measure a time interval in one of the modes discussed in the next section of this paper, and then typically repeat this process several times to obtain an averaged reading. The microprocessor then uses this time interval measurement along with programmed sound velocity and zero offset values to calculate thickness. Finally, the thickness is displayed and updated at a selected rate.
Many gages incorporate an internal datalogger and are capable of storing several thousand thickness measurements along with identification codes and setup information in memory. These stored readings may be recalled to the gage's display or uploaded to a printer or computer for further analysis or archiving.
2. Measurement Modes and Transducer Selection for Precision Gaging
The methods of making ultrasonic measurements of thickness may be classified according to the type of transducer used to make the measurement, or they may be classified by the choice of echoes used to determine the ultrasonic pulse transit time through the test piece. If we classify the measurement method by transducer type, we find three basic classifications used in precision thickness gaging:
1. Contact transducers: As the name implies, contact transducers are used in direct contact with the test piece. A thin, hard wearplate protects the active element from damage in normal use. Measurements with contact transducers are often the simplest to implement and they are usually the first choice for most common thickness gaging applications other than corrosion gaging.
2. Delay line transducers: Delay line transducers incorporate a cylinder of plastic, epoxy, or fused silica known as a delay line between the active element and the test piece. A major application for them is for thin material measurement, where it is important to separate the excitation pulse recovery from backwall echoes. A delay line can also be used as a thermal insulator, protecting the heat-sensitive transducer element from direct contact with hot test pieces, and delay lines can be shaped or contoured to improve sound coupling into sharply curved or confined spaces.
3. Immersion transducers: Immersion transducers use a column or bath of water to couple sound energy into the test piece. They can be used for on-line or in-process measurement of moving product, for scanned measurements, or for optimizing sound coupling into sharp radiuses, grooves, or channels.
If we classify the measurement techniques by the choice of echoes used in making the transit time measurement, we find that there are again three basic classifications or modes:
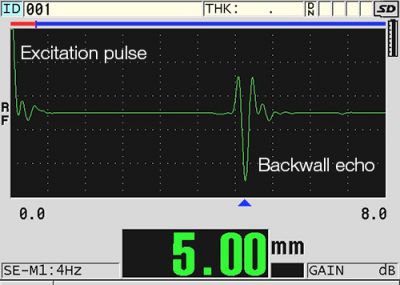
Mode 1 - In Mode 1, measurement is made between an excitation pulse and the first backwall echo from the test piece, using contact-type transducers. It is a general purpose test mode and is normally recommended for use unless one of the conditions described under Modes 2 or 3 is present.
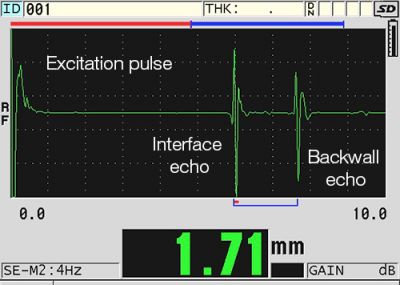
Mode 2 - In Mode 2, measurement is made between an interface echo representing the near surface of the test piece and the first backwall echo, using delay line or immersion transducers. In plastics, Mode 2 can improve minimum thickness resolution over Mode 1. It is also used for measurements on sharp concave or convex radiuses or in confined spaces with delay line or immersion transducers, for on-line measurement of moving material with immersion transducers, and for high-temperature measurements.
Mode 3 - In Mode 3, measurement is made between two successive backwall echoes, using delay line or immersion transducers. It may be employed only when clean multiple backwall echoes appear, which typically limits its use to materials of relatively low attenuation and high acoustic impedance such as fine-grained metals, glass, and ceramics. Mode 3 typically offers the highest measurement accuracy and the best minimum thickness resolution in a given application, at the expense of penetration, and it is commonly used when accuracy and/or resolution requirements cannot be met in Mode 1 or 2.
These classifications are summarized in Figure 2, which gives a schematic representation of the three modes of timing and the types of transducers that can be employed for each.
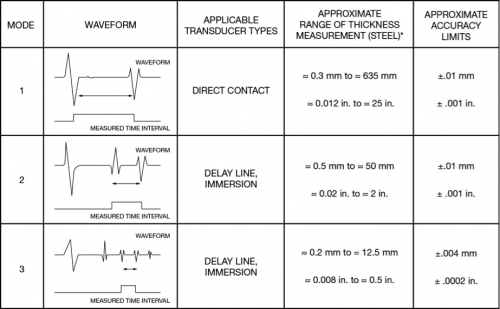
* Thickness ranges assume a sound velocity of approximately 5.9 mm/µS or .23 in/µS and further assume that maximum range is not limited by scattering or sound attenuation in the material.
Figure 2 – Precision ultrasonic gaging techniques classified by the echoes used to make the measurements.
The transducers used in precision thickness gaging are normally broadband single element designs. An additional common type of transducer is the dual element, or "dual", which is normally used for corrosion survey applications rather than the precision gaging work that is the subject of this paper. As their name implies, dual element transducers use a pair of separate piezoelectric elements, one for transmitting and one for receiving, bonded to separate delay lines. Thickness measurement is made in a modified Mode 1 method, reading to the first backwall echo and subtracting a zero offset equal to the transit time through the delays. Dual element transducers are typically rugged and able to withstand exposure to high temperatures, and are highly sensitive to detection of pitting or other localized thinning conditions. However they are generally not recommended for precision thickness gaging applications because of the possibility of zero drift and timing errors related to V-path correction. For further information on the use of dual element transducers, contact Olympus SSA or see this application note.
3. Factors Affecting Performance and Accuracy
The selection of the appropriate transducer for a given application is based on the range and resolution of the thickness measurement required, the acoustic properties of the test material(s), and part geometry. In many cases this is best established by experimentation with test standards representing the desired range of measurement. In general, the highest frequency and smallest diameter transducers that will give acceptable results over the required range would be recommended. Small diameter transducers are more easily coupled to the test material and permit the thinnest couplant layer at a given contact pressure. Furthermore, higher frequency transducers produce echoes of faster rise time and thereby enhance the precision of thickness measurements. On the other hand, the acoustic properties or surface condition of the test material may require large, low frequency transducers to overcome poor coupling or signal losses due to scattering or attenuation. Selection of the optimum transducer in some cases will require compromising penetration for the sake of thin material resolution, or vice versa. In some cases two or more transducers will be required to cover a required range of measurement in its entirety. Consult Olympus SSA for assistance in transducer selection.
There are a number of important factors that will affect performance and accuracy in common gaging applications.
a) Calibration: The accuracy of any ultrasonic measurement is only as good as the accuracy and care with which the gage has been calibrated. All ultrasonic gages provide a method for calibrating sound velocity and zero offset appropriate for the application at hand. It is essential that this calibration be performed and periodically verified in accordance with the manufacturer's instructions. Sound velocity must always be set with respect to the material being measured. Zero offset is usually related to the type of transducer, transducer cable length and mode of measurement being used.
b) Surface roughness of the test piece: The best measurement accuracy is obtained when both the front and back surfaces of the test piece are smooth and parallel. If the contact surface is rough, the minimum thickness that can be measured may be increased because of sound reverberating in the increased thickness of the couplant layer. There will also be potential inaccuracy caused by variations in the thickness of the couplant layer beneath the transducer. Additionally, if either surface of the test piece is rough, the returning echo may be distorted due to the multiplicity of slightly different sound paths seen by the transducer, and some degree of measurement uncertainly will result.
c) Coupling technique: In Mode 1 direct contact measurements, the couplant layer thickness is part of the measurement and is compensated by a portion of the calibrated zero offset. If maximum accuracy is to be achieved, the coupling technique must be consistent. This is accomplished by using a couplant of reasonably low viscosity, employing only enough couplant to achieve a reasonable reading, and applying the transducer with uniform pressure. A little practice will show the degree of moderate to firm pressure that produces repeatable readings. In general, smaller diameter transducers require less coupling force to squeeze out the excess couplant than larger diameter transducers. In all modes, tilting the transducer will distort echoes and cause inaccurate readings, as noted below.
d) Curvature of the test piece: A related issue involves the alignment of the transducer with respect to the test piece. When measuring on curved surfaces, it is important that the transducer be placed approximately on the centerline of the part and held as nearly normal to the surface as possible. In some cases a spring-loaded V-block holder may be helpful for maintaining this alignment. In general, as the radius of curvature decreases, the size of the transducer should be reduced, and the more critical transducer alignment will become. For very small radiuses, an immersion approach will be necessary. In some cases it will be useful to observe a waveform display as an aid in maintaining optimum alignment. Often practice with the aid of a waveform display will give the operator a proper "feel" for the best way to hold the transducer.
On curved surfaces it is important to use only enough couplant to obtain a reading. Excess couplant will form a fillet between the edges of the transducer and the radiused test surface where sound will reverberate and possibly create spurious signals that may trigger false readings.
(e) Taper or eccentricity: If the contact surface and back surface of the test piece are tapered or eccentric with respect to each other, the return echo will be distorted due to the variation in sound path across the width of the beam. Accuracy of measurement will be reduced. If the misalignment between outer and inner surfaces is significant, no measurement will be possible.
(f) Acoustic properties of the test material: There are several conditions found in certain engineering materials that can potentially limit the accuracy and range of ultrasonic thickness measurements:
- Sound Scattering -- In materials such as cast stainless steel, cast iron, fiberglass, and composites, sound energy will be scattered from individual grains in the casting or from fiber/matrix boundaries within the fiberglass or composite. Porosity in any material can have the same effect. Gage sensitivity must be adjusted to prevent detection of these spurious scatter echoes. This compensation can in turn limit the ability to discriminate a valid but small return echo from the back side of the material, thereby restricting measurement range.
- Sound Attenuation or Absorption -- In certain polymers such as low density plastics, polyurethane, and rubber, sound energy can be attenuated very rapidly at the frequencies used for ultrasonic gaging. This attenuation typically increases with temperature. The maximum thickness that can be measured in these materials will often be limited by attenuation.
- Velocity Variations -- An ultrasonic thickness measurement will be accurate only to the degree that material sound velocity is consistent with gage calibration. Some materials exhibit significant variations in sound velocity from point to point. This happens in certain cast metals due to the changes in grain structure that result from varied cooling rates, and the anisotropy of sound velocity with respect to grain structure. Fiberglass can show localized velocity variations due to changes in resin/fiber ratio. Many plastics and rubbers show a rapid change in sound velocity with temperature, requiring that velocity calibration be performed at the temperature where measurements are to be made.
(g) Phase Reversal or Phase Distortion -- The phase or polarity of a returning echo is determined by the relative acoustic impedances (density x velocity) of the boundary materials. Commercial gages typically assume the customary situation where the test piece is backed by air or a liquid, both of which have lower acoustic impedances than metals, ceramics, or plastics. However, in some specialized cases (such as measurement of glass or plastic liners over metal, or copper cladding over steel) this impedance relationship is reversed, and the echo appears phase reversed. To maintain accuracy in these cases it is necessary to change the appropriate echo detection polarity.
A more complex situation can occur in anisotropic or inhomogeneous materials such as coarse-grain metal castings or certain composites, where material conditions result in the existence of multiple sound paths within the beam area. In these cases phase distortion can create an echo that is neither cleanly positive nor negative. Careful experimentation with reference standards is necessary in these cases to determine effects on measurement accuracy. If the effect is consistent it will usually be possible to compensate by means of a zero offset adjustment, but if echo shape is variable, highly accurate thickness measurements will not be possible.
4. Couplants
A wide variety of couplant materials may be used in ultrasonic gaging. Propylene glycol and glycerin are commonly used and are suitable for most applications. In applications where maximum transfer of sound energy is required, as with very thick or attenuating materials, glycerin is recommended. However, on some metals glycerin can promote corrosion by means of water absorption and thus may be undesirable. Other suitable couplants for measurements at normal temperatures may include water, various oils and greases, gels, and silicone fluids.
In some applications involving smooth surfaces, it is possible to substitute in place of liquid couplant a thin compliant membrane (such as a thin piece of polyurethane) between the face of the transducer or delay line and the test piece. This approach will often require changes to gage setup parameters and requires that the transducer be pressed firmly to the surface of the test piece.
As noted below, measurements at elevated temperatures will require specially formulated high temperature couplants.
5. High Temperature Measurements
Measurements at elevated temperatures (higher than approximately 50° Celsius or 125° Fahrenheit) represent a special category. First, it is important to note that standard direct contact transducers will be damaged or destroyed by exposure to temperatures higher than this limit. This is due to the varying thermal expansion coefficients of the materials used to construct them, which will cause disbonding at elevated temperatures. Direct contact transducers should never be used on a surface that is too hot to comfortably touch with bare fingers. Thus, high temperature measurements should always be done in Mode 2 or Mode 3 with either a delay line transducer (with an appropriate high temperature delay line) or an immersion transducer.
Sound velocity in all materials changes with temperature, normally increasing as the material gets colder and decreasing as it gets hotter, with abrupt changes near the freezing or melting points. This effect is much greater in plastics and rubber than it is in metals or ceramics. Velocity changes are related to changes in elastic modulus and density, and depending on the material and temperature range the relationship can be significantly non-linear. For maximum accuracy, the gage sound velocity setting should be calibrated at the same temperature where measurements will be made. Measurement of hot materials with a gage set to room temperature sound velocity will often lead to significant error.
Finally, at temperatures greater than approximately 100° C or 200° F, special high temperature couplants are recommended. A variety of them are available from commercial sources.
6. On-Line Measurements
Continuous on-line ultrasonic thickness gaging can be performed on most engineering materials, providing a constant process monitor, and is particularly appropriate for extruded plastics and metal sheets and pipes. It is usually done by coupling the sound energy into the test piece through a water column generated by a bubbler or squirter, or in a water bath. Measurement is normally performed in Mode 2 or 3, although in a few special cases sliding direct contact transducers working in Mode 1 have been employed. For accurate on-line ultrasonic measurement, material temperature must be stable to avoid errors due to velocity variations. Surfaces must be smooth enough to insure consistent coupling, and some type of fixturing is always required to maintain precise alignment between the transducer(s) and test piece.
7. Cable Length
Certain specialized applications such as underwater testing require a long cable between the transducer and ultrasonic gage. While much of this work involves corrosion gaging and is therefore outside the scope of this paper, some precision gaging applications require long cables as well. The length of cable that produces a significant effect on performance is application specific, depending on transducer frequency as well as accuracy and minimum measurement range requirements. At 20 MHz, cable reflections will begin to affect waveform shape at lengths beyond about 1 meter or 3 feet. At lower frequencies, somewhat longer cables can be used without any special considerations. However, performance with long cables should always be experimentally evaluated in light of specific application requirements, particularly when cable length exceeds approximately 3 meters or 10 feet. In Mode 1measurements, cable reflections can increase the length of the excitation pulse and limit minimum measurable thickness, and zero offset must be adjusted to compensate for the propagation time of electrical pulses through the cable. In Modes 2 and 3, cable reflections can cause distortion of interface and backwall echoes, and in extreme cases (cables on the order of 30 meters/100 feet or greater) they can even result in large spurious signals following desirable signals at an interval equal to the electrical transit time in the cable.
8. Further Notes on Modes of Measurement
Mode 1: Excitation Pulse to First Back Echo
Ultrasonic thickness measurements utilizing direct contact transducers in Mode 1 are often the simplest to implement and can be used in the majority of common applications. For most materials the contact method of measurement provides the highest coupling efficiency of ultrasound from the transducer into the test piece. Mode 1 contact measurements are commonly recommended when minimum material thickness does not fall below approximately 0.25 mm (0.010 inches) of plastic or 0.5 mm (0.020 inches) of metal, precision required is not better than +/-25 micrometers (0.001 inch), test material is at or close to room temperature, and geometry permits contact coupling.
In this mode of measurement, the time interval between the excitation pulse and the first returned echo includes a small time increment representing pulse transit time through the transducer wearplate and the coupling fluid, as well as cable delay and any offset due to rise time or frequency content of the detected echo. In order to compensate for these factors, gages are provided with a zero offset function, which effectively subtracts from the total measured time interval a period equivalent to the sum of these various fixed delays. Zero offset normally must be adjusted whenever the transducer type is changed. This may be done with the aid of a reference standard of known thickness and sound velocity, or, if velocity is unknown, two standards of different known thicknesses which can be used to establish both velocity and zero.
Mode 2: Interface Echo to First Backwall Echo
Measurements between the first two echoes following the excitation pulse are categorized as Mode 2. Normally this involves measurement from an interface echo (representing the boundary between a delay line or water path and the outside surface of the test piece) and a backwall echo representing the inside surface.
There are several conditions that must be considered in making Mode 2 measurements, based on the fact that they require two valid echoes, interface and backwall. First, it is necessary to insure that an interface echo exists. There are certain cases involving immersion measurements of low impedance materials such as soft plastics and silicones where the acoustic impedance of the test material is very similar to that of water. A similar situation can occur when a delay line transducer is used on a material (typically a polymer) whose impedance nearly matches that of the delay line. In such cases the impedance match between the water or delay line and the test material may reduce the interface echo to such low amplitude that it cannot reliably be detected. With delay line transducers the difficulty can usually be remedied by switching to a different delay line material, for example from the common polystyrene delays to an epoxy or polyimide. When the problem occurs in immersion measurements, there may be no easy solution, since it is rarely possible to use liquids other than water as effective immersion couplants.
The maximum thickness that can be measured in a Mode 2 setup is determined by the length of the delay line or water path, since the backwall echo from the test piece must arrive before multiples of the interface echo. In some cases range can be extended by lengthening the delay line or water path, however Mode 2 is generally not well suited for measurement of thick materials.
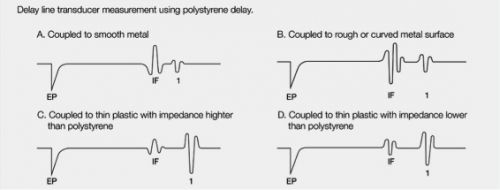
When working in Mode 2 it is also necessary to monitor the phase or polarity of both interface and backwall echoes, and adjust instrument detection polarity and/or zero offset to compensate as necessary for inversions. A plastic delay line coupled to a metal test piece represents a low-to-high impedance boundary, seen as a positive interface echo, while the same delay line coupled to many polymer materials can represent a high-to-low relationship of relative acoustic impedance representing a negative interface echo. The interface echo polarity reverses between these two situations, and if the gage is not properly adjusted a measurement error will result. This can happen when a gage with a delay line transducer is set up on metal reference blocks and then used to measure plastics. Additionally, a rough metal surface may create a negative interface echo due to the couplant gap under the transducer, while high impedance plastics can produce a positive interface. By observing the echoes an operator can select the correct detection polarity in a given case. Figure 3 shows some examples of commonly encountered conditions.
Interface and backwall echo phase distortions can also occur in setups involving sharply radiused material, where complex interactions between beam shape and front and back surface curvature can significantly affect echo shape. In such applications it is essential to set up the instrument on reference standards representing the actual material shape to be measured, so that the effects of any phase distortion can be compensated with zero offset.
Mode 3: Echo to Echo Following Interface
The Mode 3 measurement technique as defined here involves the measurement of a time interval between successive back echoes following an interface echo. This mode is normally reserved for situations where the test material is relatively thin, and where the highest level of accuracy is required. Mode 3 measurement is best applied to low attenuation engineering materials having an acoustic impedance greater than 1 x 10⁶ gm/cm2-sec (which includes most metals, ceramics, and glass). In materials of this type, successive reverberations are all of the same polarity, and the relative amplitude of successive echoes is determined by the transmission coefficient of the sound energy out of the material into either polystyrene or water. Since both of these materials are of relatively low acoustic impedance, the ratio of successive echo signal amplitudes is usually greater than 50% or -6dB.
For most applications, a delay line transducer will be more convenient than immersion in Mode 3 measurements. Delay line transducers can be used to make measurements over a range from approximately 0.15 mm/0.006" up to 12.5mm/0.5", depending on frequency and delay line length. As with direct contact transducer measurements, the diameter or active element size of the delay line should be reduced as the radius of curvature is reduced. For radiuses smaller than approximately 3mm/0.125", immersion transducers will provide better coupling and are preferred.
The maximum thickness that can be measured in a Mode 3 setup is determined by the length of the delay line or water path, since two backwall echoes from the test piece must arrive before multiples of the interface echo. In some cases range can be extended by lengthening the delay line or water path, however Mode 3 is not well suited for measurement of thick materials.
If accurate thickness measurements are required on machined surfaces having a surface finish of approximately 3 microns RMS, Mode 3 measurements utilizing a delay line transducer will often give more repeatable readings than a Mode 1direct contact transducer. This is due to the fact that successive echo reverberations tend to subtract out the variable thickness of the couplant layer that adds to the time interval measured using a direct contact transducer. The same general principle applies to painted surfaces, where multiple echoes will represent reverberations in the metal or other high-impedance material, not the paint. However, there are limitations on what sort of surfaces will permit Mode 3 measurement, and in the case of severe roughness or corrosion this technique will not be applicable. At least two clean backwall echoes are required for a Mode 3 measurement, and as conditions get worse the signal losses due to roughness will eventually obliterate the second echo.
When using focused immersion transducers for Mode 3 measurements, and/or when measuring certain radiuses, it is always necessary to observe the waveform during initial setup. The advantage of focused as opposed to unfocused immersion transducers of the same frequency and size is that they often tolerate more beam angulation or misalignment, as well as improve coupling into radiused test pieces. Spurious or unwanted signals may appear and, unless electronically blanked, lead to inaccurate measurements.
Two possible situations are illustrated in Figure 4. Figure 4a shows optimum echoes for Mode 3 measurement, a series of clean multiple echoes. In Figure 4b the time interval measurement is being erroneously made between the first and second cycle of the first backwall echo. This condition can exist whenever echoes are ambiguously shaped, which can be due both to misalignment and improper focusing. Figure 4c illustrates and erroneous time measurement between the first backwall echo and a mode converted shear echo which can result when a focused immersion transducer is used and the water path between the transducer and the surface of the test piece is too long. In order to obtain clean multiple echoes for thickness measurement, a focused immersion transducer would ideally be operated short of the focal length. If it is operated at or near the focal length, intermediate shear mode echoes will usually occur. (Note that this is a problem only in Mode 3 measurements; in Mode 2 nothing following the first backwall echo is of interest.) Similar effects can occur in some cases where sharply radiused targets cause refraction and/or mode conversion of beam components arriving at other than normal incidence. In general, it is often advisable to experiment with different combinations of focus and water path to determine what produces the cleanest multiple echoes in a given measurement application.
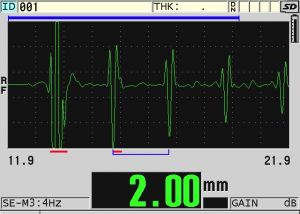 4a. Proper measurement of clean echoes | 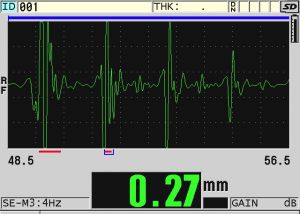 4b. Error - measurement of successive lobes of single echo |
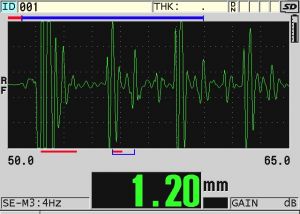 4c. Error - measurement of mode converted shear wave echo |
Figure 4 – Examples of Mode 3 Waveforms
Appendix 1 summarizes some typical applications where these measurement modes are applied. Please note that the thickness range, accuracy, and transducer recommendations are intended only as a general guide. Because of possible variations in material acoustic properties and the effects of geometry, the exact range and accuracy in a given application should always be verified with the aid of reference standards of the material in question. In some cases measurement will be possible over greater ranges than indicated in the table, and in other cases less. And although transducer recommendations are shown, it will often be possible to use two or more different transducers with essentially equivalent results over a specified range.
Conclusion
This paper has summarized some of the major aspects of precision ultrasonic thickness gaging. For further information on any of the points discussed, or recommendations for specific equipment, contact Olympus SSA.
Appendix I Example measurement ranges with selected transducers
Notes: All thickness ranges are rounded and approximate. The actual measurement range in a given case will always depend on instrument setup as well as specific material properties such as part geometry, surface condition, and microstructure. The maximum thickness in plastics in Mode 1 measurements will vary depending on the type of plastic, so only a minimum is listed.
These charts cover only some of the most common transducers and measurement situations. There are many other possibilities. For details, please contact Olympus NDT.
| Transducer (frequency, diameter, type) | Measurement Mode | Range (metal) | Range (plastic) |
| 20 MHz, 0.125" contact | 1 |
0.020 - 1.5 inch
0.5 – 38 mm |
0.008" minimum
0.2 mm minimum |
| 10 MHz, 0.25" contact | 1 |
0.030 -10 inch
0.75 – 250 mm |
0.010" minimum
0.5 mm minimum |
| 5 MHz, 0.5" contact | 1 |
0.050 – 20 inch
1.25 – 500 mm |
0.020" minimum
0.5 mm minimum |
| 2.25 MHz, 0.5 contact | 1 |
0.080 -25 inch
2 – 625 mm |
0.050" minimum
1.25 mm minimum |
| 1 MHz, 1" contact | 1 |
0.150 -25 inch
4 – 625 mm |
0.100" minimum
2.5 mm minimum |
| 0.5 MHz, 1" contact | 1 |
0.250 -25 inch
6.25 – 625 mm |
0.200" minimum
5 mm minimum |
| 20 MHz, 0.125" delay line | 2 |
0.015 - 0.400 inch
0.4 – 10 mm |
0.005 - 0.200 inch
0.125 – 5 mm |
| 20 MHz, 0.125" delay line | 3 |
0.008 -0.200 inch
0.2 – 5 mm | N/A |
| 10 MHz, 0.25" delay line | 2 |
0.020 - 0.750 inch
0.5 – 20 mm |
0.012 - 0.250 inch
0.3 – 6 mm |
| 10 MHz, 0.25" delay line | 3 |
0.012 - 0.500 inch
0.3 - 10 mm | N/A |
| 5 MHz, 0.5" delay line | 2 |
0.050 -1.00 inch
1.25 – 25 mm |
0.040 - 0.500 inch
1- 10 mm |
| 5 MHz, 0.5" delay line | 3 |
0.050-0.500 inch
1.25 – 10 mm | N/A |
| 2.25 MHz, 0.5" delay line | 2 |
0.080 -1.00 inch
2 – 25 mm |
0.050 -0.500 inch
1.25 – 10 mm |
| 2.25 MHz, 0.5" delay line | 3 |
0.060 -0.500 inch
2.5 – 10 mm | N/A |
