Eddy Current Probe Selection: Finding the Right Probe for Your Application
Advancements in eddy current probe technology provide different industries with several new capabilities and benefits. If nondestructive testing is a critical activity in your manufacturing processes, this article will help you find the right eddy current probe for your industry. We cover some of the most common applications of eddy current technology and recommend inspection probes that will provide accurate results and help manufacturers meet production demands. We also look at the different coil types available and other factors to consider when purchasing eddy current testing equipment.
What Probe Coil Types Are Available?
Early eddy current (EC) coils generally had either no core (air core) or a ferrite center core only. Meter instruments were used almost exclusively, and sensitivity was comparatively low, but in most cases adequate. Many inspections are still being done using this type of comparatively large, low-sensitivity coils. Here are the different coils used in eddy current testing probes:
Absolute Type Coils
A widely used absolute type coil emits a 100 kHz frequency and has a diameter of 2.5 mm (0.1 in.) to 5 mm (0.2 in.), which fits most older bridge type meter instruments (Figure 1). The sensitivity is acceptable for long cracks that exceed the probe diameter by a factor of approximately 2, as the field is considerably larger than the coil size. This also produces a large edge effect.
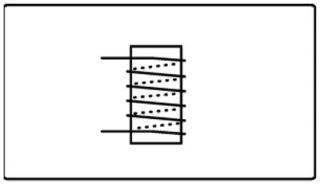
(Figure 1)
A suitable alternative now offered is a smaller coil, measuring approximately 1.5 mm (0.060 in.) in diameter with a shield (preferably ferrite) around it. This gives improved sensitivity to short cracks and good isolation from edges, bolt heads, etc.
Older absolute probes were normally calibrated using an infinitely long (to the coil) notch, 1 mm (0.04 in.) or 0.5 mm (0.02 in.), and their sensitivity would drop off rapidly with shorter notches. New probes maintain their sensitivity with a notch approximately the internal diameter of the ferrite shield and will still detect a shorter one.
Even meter instruments benefit from this type of coil, but the scanning speed is limited as the needle needs time to respond. Display-type instruments enable much faster scanning. Larger surface type probes respond in a similar way to the above. Shielding produces similar improvements when looking for subsurface cracks or corrosion.
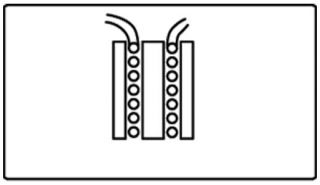
(Figure 2)
Differential Type Coils
Differential coils have the advantage of built-in liftoff compensation. This has made them useful for many applications. Older coils had no ferrite shield and were built by placing two coils side by side (Figure 3) without shielding. Later types added individual shields (Figure 4), but the greatest improvement to sensitivity was achieved when both coils were placed within a common shield (Figure 5). Differential type probes are mostly used in small sizes for surface crack detection only.
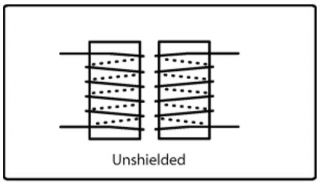
(Figure 3)
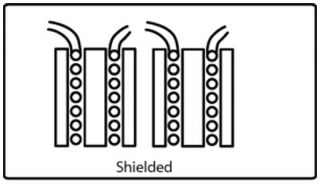
(Figure 4)
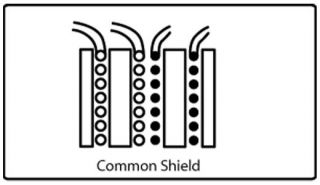
(Figure 5)
In a probe of this type, the coils are wound in opposing orientations. Consequently, signals that affect both simultaneously will cancel out (such as liftoff signal). Normally the air point and the working point will be close, but some difference is present due to small coil variations. The normal scan direction is shown in Figure 6, and the resulting typical display presentation in Figure 7. The double indication is, in fact, helpful as it doubles the size of the defect on the screen making it easier to identify.
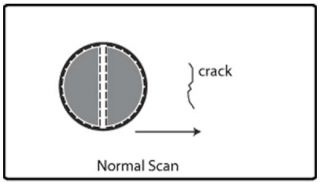
(Figure 6)
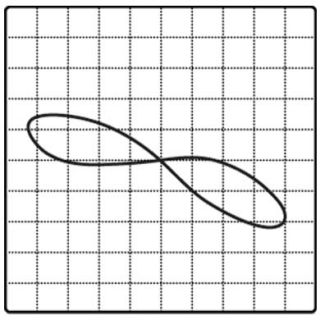
(Figure 7)
Sometimes it is necessary to scan in the same direction as the cracks (Figure 8). This is permissible, and the result will be similar as for a very short defect. A larger defect affecting both coils will tend to cancel out because they are in opposition, but in practice there are enough differences in angle and depth to prevent it disappearing completely. In any case, the ends of the crack will show normally.
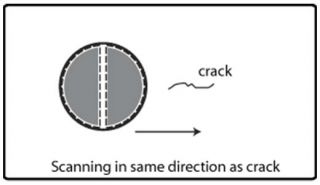
(Figure 8)
Differential type coils can be installed into pencil, bore hole, or molded probes to fit almost any shape.
Bridge and Reflection Coils
Older coils of this type were normally connected to the two branches of a bridge configuration (Figure 9). Later bridge and reflection coils have also been used in the reflection mode where separate coils are used for generating and detecting the eddy currents (Figure 10).
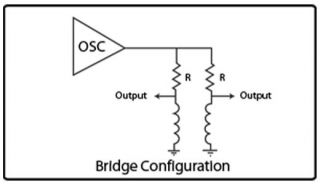
(Figure 9)
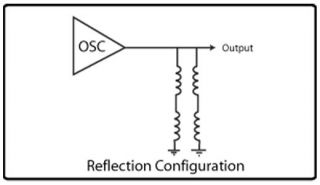
(Figure 10)
Bridge coils provide a generally good performance, particularly if the probe is designed for a specific application and frequency. Reflection coils will often provide greater gain and a wider frequency range of operation, but they are more complicated to manufacture. They also have less drift. Reflection probes are also used in special probe designs (such as sliding probes) that rely on the transmit-receive principle to create a certain sized and shaped sensitive area.
What Probe Is Best for My Application?
In this section, we’ll go through the different common applications for eddy current probes and recommend the probe and frequency will help you achieve the desired results from your inspection.
Surface Crack Detection
Eddy current probes are used for detecting surface cracks in ferrous and nonferrous materials.
Recommended operating frequency:
Aluminum: 100 kHz–1 MHz
Steel: 1 MHz–2 MHz
Inconel titanium: 2 MHz–5 MHz
Recommended probes:
Pencil types: Absolute or differential, shielded or unshielded
Surface types: Larger diameter probes can sometimes be used
Sliding probes: For cracks starting under fastener heads
Wheel probes: For bead seat radius, molded
Subsurface Crack Detection
Eddy current probes are used for finding subsurface cracks in nonferrous materials.
Recommended operating frequency:
Frequency settings are critical for detecting subsurface cracks in nonferrous materials; aim for a range 100 Hz to 100 kHz depending on the depth of penetration.
Recommended probes:
Surface probes: Normally absolute shielded. Diameter can be as large as spacing between fasteners
Encircling probes: Provide better penetration. Inner diameter (ID) must be close to fastener head diameter
Sliding probes: For fast directional inspection (reflection)
Low-frequency crack detectors require larger probes to achieve suitable coil inductances. Phase sensing circuits are also required because subsurface fields are influenced by phase changes.
Bore Hole Crack Detection
Eddy current inspection of boreholes using probes is a well-established method for aircraft inspection.
Recommended operating frequency:
Frequency should be the same as for surface cracks.
Aluminum: 100 kHz–1 MHz
Steel: 1 MHz–2 MHz
Inconel titanium: 2 MHz–5 MHz
Recommended probes:
Absolute: (preferably shielded) in-hand operated or scanner versions
Differential: (shielded or unshielded) in-hand operated or scanner versions
Probes can be expanding (contact type) or nonexpanding (slightly below hole size). Contact probes can be more sensitive to cracks (no liftoff distance) but they also generate scanning noise. Low-frequency types can be used to penetrate through brass bushings. Automated systems can be implemented.
Coating Thickness Measurement
Its high near-surface resolution makes eddy current testing useful for accurately measuring the thickness of coatings on metal substrates.
Recommended operating frequency:
Frequency varies with type of coating.
Nonconductive coatings can be considered as liftoff measurements.
Metallic coatings require good penetration, but as they are normally very thin, fairly high frequencies can be used.
Recommended probes:
Standard absolute pencil
Surface probes
Measuring Conductivity
Eddy current probes can be used for electrical conductivity measurement. For nonmagnetic materials, the change in impedance of the coil can be correlated directly to the conductivity of the test material.
Recommended probes:
Standard absolute pencil
Surface probes
More accurate measurements require special conductivity meters and probes
Corrosion/Thickness Testing
Eddy current array (ECA) technology offers major advantages over conventional eddy current inspection methods when it comes to corrosion detection and thickness testing.
Recommended frequency:
Frequency must be able to penetrate the thickness required. Use the eddy current slide rule or graph attached.
Recommended probes:
Shielded surface probes
Other Factors to Consider When Selecting an Eddy Current Probe
Selecting the correct probe and frequency is the key factor when looking for equipment that meets your testing and inspection needs, but there are some additional factors that are worth considering before purchase:
Research, Development, and Industry Experience
Quality and design of eddy current probes are closely linked to the manufacturer’s experience in the industry. You should look for manufacturers who have invested years developing industry-leading technology. It’s very unlikely that your inspection requirements are completely unique, and you can look at manufacturers experience working with similar industries to your own to help you make the right decision.
Olympus has been developing scientific solutions for 100 years. We work with some of the biggest industries in the world to bring them leading nondestructive testing technology. You can explore the eddy current probes we have available on our website.