The growing complexity of today’s technical products demands new levels of contamination control
The increasing complexity of technical products in the automotive, aerospace, heavy machinery, and electrical engineering industries requires clean production conditions and components. Residues on the surface of technical devices and parts can cause unreliable and/or poor device performance; the presence of particle residue in manufacturing processes can cause downtime in production, reduced lead times, the waste of materials and energy, and returned product.
Technical cleanliness inspection applications include ABS systems, diesel injectors, brake calipers, hydraulic fluid systems, tubing, PCBs, interconnects, and large heavy machinery components.
Cleanliness Inspection Process
Technical cleanliness inspection is an involved process that includes a number of preparation and inspection steps. The following is an overview of this process (subsequent blogs will provide a more in-depth look at the steps involved in preparation and inspection):
Preparation
Preparing components for inspection includes the following steps:
- Parts Washing: Preparation begins when a sample of parts is pulled off the production line and washed prior to extraction.
- Extraction: Particles are removed from the components being tested in an extraction cabinet located in a clean room. Particles can be removed by flood, squirt, rinse, or ultrasonic bath.
- Filtration: The extraction rinse is filtered and the extracted particles are collected on a membrane filter (filter materials include cellulose, polyester, glass fiber, and nylon mesh).
- Drying and Weighing: The membrane filter is dried and ready for further analysis. The dried filter, with all impurities on it, is then weighed using an analytical balance.
Inspection
The inspection process includes the following steps:
- Image Acquisition and Stage Movement: The dried membrane filter is mounted on a motorized microscope stage so that the images needed for inspection can be acquired.
- Particle Detection: Membrane filter images are examined for particles, which appear as dark areas against a bright background.
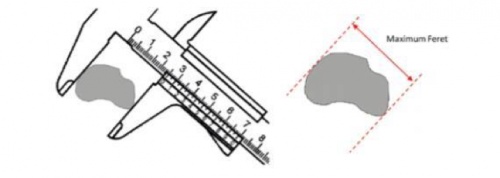
- Particle Size Measurement: Detected particles are measured according to different parameters, including Maximum Feret and Equivalent Circle diameter.
 |
- Particle Size Classification: Once particles have been measured, they are grouped into different size classes. The two major size classes are differential (defined by a minimum and maximum size) and cumulative (defined only by a minimum particle size).
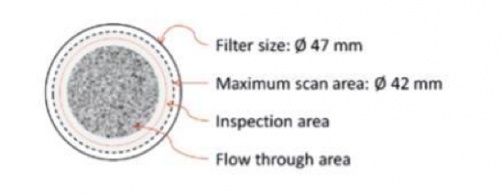
- Particle Count Extrapolation: A defined area on the membrane filter is scanned and checked for particles. These areas may include filter size (the total area of the filter), flow-through area (the filter area covered with particles), maximum scan area (the maximum possible area to be scanned for inspection), and inspection area (the actual scan area defined by the user).
 |
- Particle Count Normalization: The extrapolated particle count is normalized to the comparison value, enabling the comparison of multiple measurements. Normalization methods include washed area (particle count is normalized on a 1000 cm2 area), washed volume (particle count is normalized on a 100 cm3 area), washed parts (particle count is normalized on a single sample part), and filtered fluid (particle count is normalized on a filtered fluid of 1 ml or 100 ml).
- Contamination Level Calculation: This level of classification is determined not by particle size but by the total number of particles in a defined contamination class (classes are defined for most international standards).
- Cleanliness Code Definition: Some standards reduce the representation of measured data to a brief description. This Cleanliness Code is defined by the standard and is composed of particle size classes and contamination levels.
- Maximum Approval Check: Checking for a maximum approval value is an optional step. If a maximum value is required, it is specified in the inspection configuration and may be an absolute number of particles or a maximum Cleanliness Code.
- Separation of Reflective and Non-Reflective Particles: The distinction between metallic and nonmetallic particles is made by determining whether particles reflect light or not (extremely important as metallic particles stand to cause much greater harm than nonmetallic particles).
- Fiber Identification: Fibers detected on the membrane filter often have a different origin (i.e., work clothes or rags) than the other particles found on the filter. Fibers thus need to be recognized and analyzed or disregarded depending on the standard being used for assessing the cleanliness examination.
- Results Review: The following operations are possible as part of this review: the deletion of items incorrectly identified as particles; the splitting of particles located close together and incorrectly identified as a single large particle; the merging of particle segments located close together and incorrectly identified as separate particles; the correction of incorrect particle labels (i.e., metallic vs. nonmetallic).
- Report Creation: A technical cleanliness inspection report may include the description of certain particle acquisition parameters, particle classification tables, particle area coverage details, and images of the largest particles.
OLYMPUS CIX Series: Designed for Technical Cleanliness Inspection
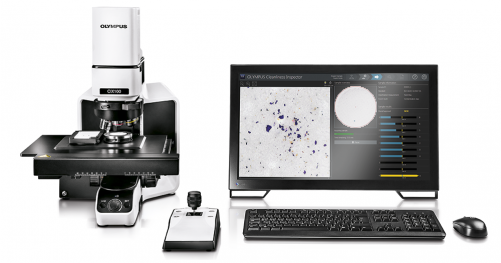
Technical cleanliness inspection presents a number of challenges, including the need to check results during inspection, view reflective and non-reflective particles at the same time, inspect multiple samples on a daily basis, revise and recalculate results based on different standards, and share results in compliance reports. Designed specifically for technical cleanliness inspection, the OLYMPUS CIX series addresses each of these situations while also delivering ease of use and maximum user convenience. The OLYMPUS CIX series’ high-end optical components; seamless integration of hardware and software; and robust, maintenance-free design ensure reproducible imaging conditions and make cleanliness inspection a routine task.
 |


